
TrustEasy is a trust account management software designed for Tax Practitioners to efficiently streamline FFR(Fee From Refund) processing by automating fee calculations and generating separate payment files for clients and practitioners. This, along with features like automated bank feeds and reconciliation, enhances compliance and reduces the risk of errors. By automating tasks and improving efficiency, TrustEasy allows accounting firms to focus on higher-value client services.
FAQ'S
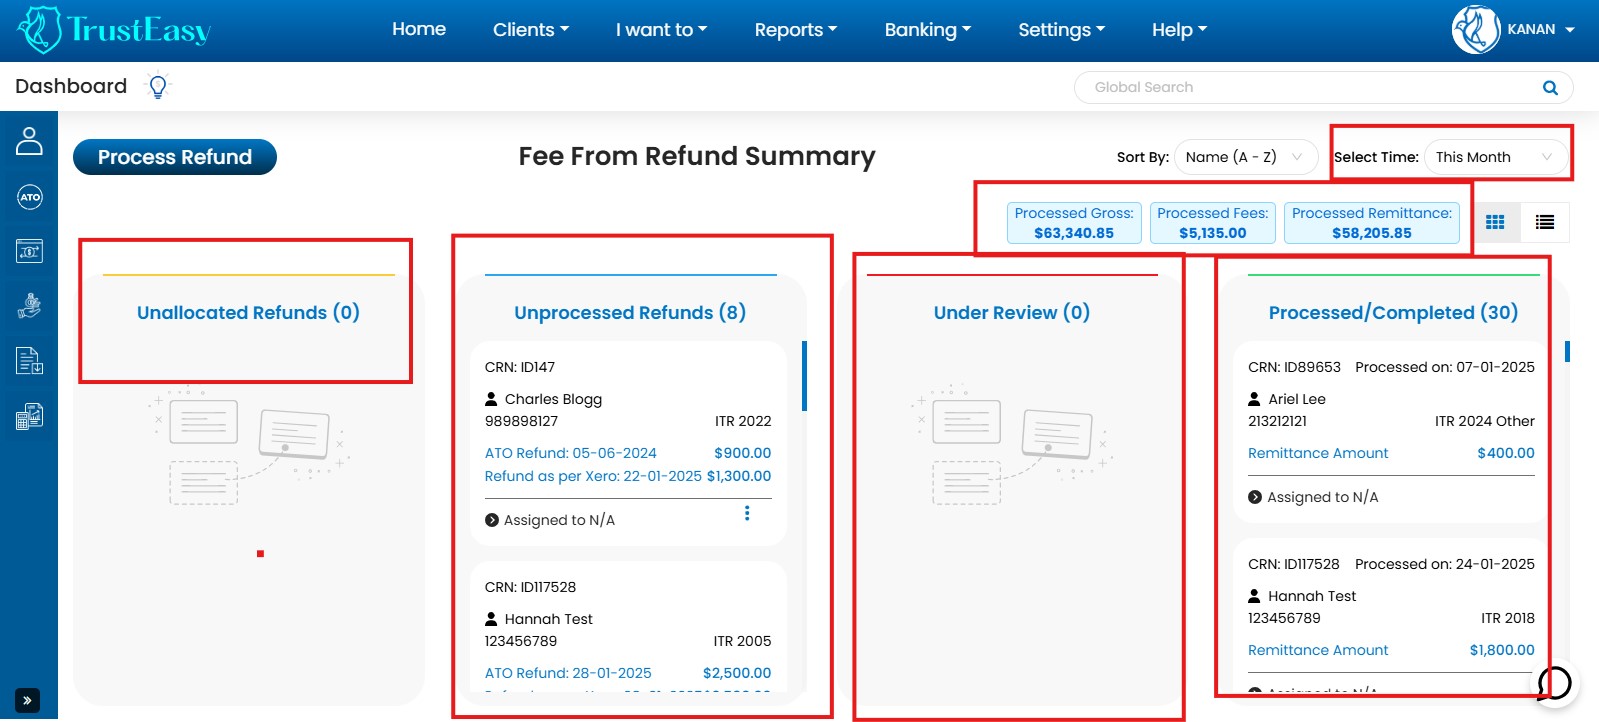
TrustEasy’s Home Page provides a user-friendly dashboard with KanBan and list views for efficient FFR(Fee From Refund) tracking:
KanBan View: This visual representation categorizes FFRs into four stages:
- Unallocated Refunds: Displays refunds processed by the ATO but not yet allocated to clients.
- Unprocessed Refunds: Shows refunds processed by the ATO, ready for client disbursement(processing and payment to clients).
- Under Review: Highlights refunds requiring further attention or verification.
- Processed/Completed: Displays successfully processed and disbursed refunds.
List View: Presents the same information as the Kanban view in a tabular format, ideal for users handling a large volume of FFRs.
Both Views allow for:
- Sorting: Organize data by name or date for easy navigation.
- Filtering: Focus on specific date ranges for targeted analysis.
Key Features:
- Clear Visual Representation: The Kanban view provides an intuitive overview of the FFR processing pipeline.
- Efficient Data Management: Sorting and filtering options enhance data organization and retrieval.
- Summary Information: The dashboard displays the total sum of processed refunds within a selected period.
By utilizing these features, TrustEasy empowers tax practitioners toefficiently manage their FFR workflow, track progress, and ensure timely andaccurate client disbursements.
To enter your firm’s details in TrustEasy, follow these steps:
- Access General Settings: Go to “Settings” in the top menu and select “General Settings”.
- Navigate to Firm Settings: Click on the “Firm Settings” tab within the General Settings area.
- Enter Firm Information:
- Provide your firm’s name, address, and tax agent number.
- Select your accounting body affiliation.
- Upload your firm’s logo.
- Specify the tax software you use.
- Enter your bank account details.
- Set Opening Balance: If applicable, enter the starting balance of your trust account.
- Set Standard Disbursement Fee: If you charge a standard fee for disbursements, enter it here for automatic inclusion during refund processing (also known as the handling fees).

By completing these steps, you ensure accurate firm information within TrustEasy, which is crucial for smooth and efficient trust account management.
To enter the banking details in the withdrawal account navigate to Settings then General Settings and the second tab will be Withdrawal Settings. Here the fees that you will be charging from the clients will be transferred into this account.

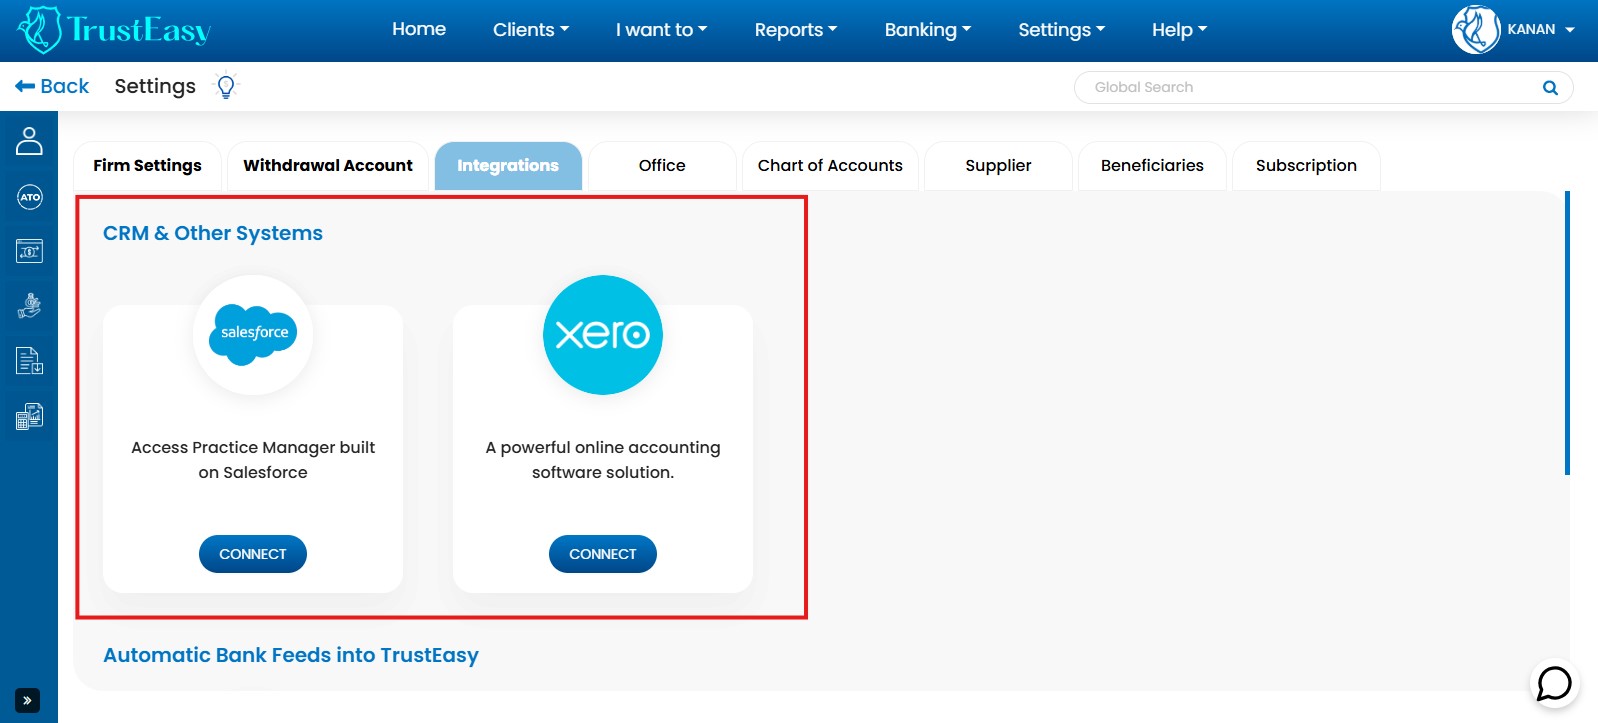
TrustEasy offers a one-way API integration with XPM and AAC (built on Salesforce) to seamlessly import your client list.
Steps:
- Establish Connection:
- Go to “Settings” > “General Settings” > “Integrations” in TrustEasy
- Click “Connect” below the Xero or Salesforce logo.
- Enter your credentials and accept their terms and conditions.
- Import Clients:
- Go to the “Clients” area in TrustEasy.
- Click “Import” and select the Xero or Salesforce logo.
- Summary Information:The dashboard displays the total sum of processed refunds within a selected period.
Important Notice:
- Import Logs:View a list of imported and non-imported clients in the Import Logs.
- TFN Masking:TFNs imported from XPM are masked (e.g. xxxx1234). Enter the full TFN manually in TrustEasy.
- Data Security:TrustEasy adheres to data security standards when exchanging information with XPM and AAC.
This integration streamlines client data entry and enhances efficiency within the TrustEasy platform.
Yes, in TrustEasy you have the option to enter multiple office details. You can do this by following these steps :
-
- Go to Settings.
- Click on “General Settings”.
- In the General Settings menu, you will find a tab called “offices”. Click on that tab.
- In the Offices tab, you can enter the details of multiple offices,
such as their names, addresses, contact information, and any other relevant details.
- Click on “Save” or “Update” to save the office details.
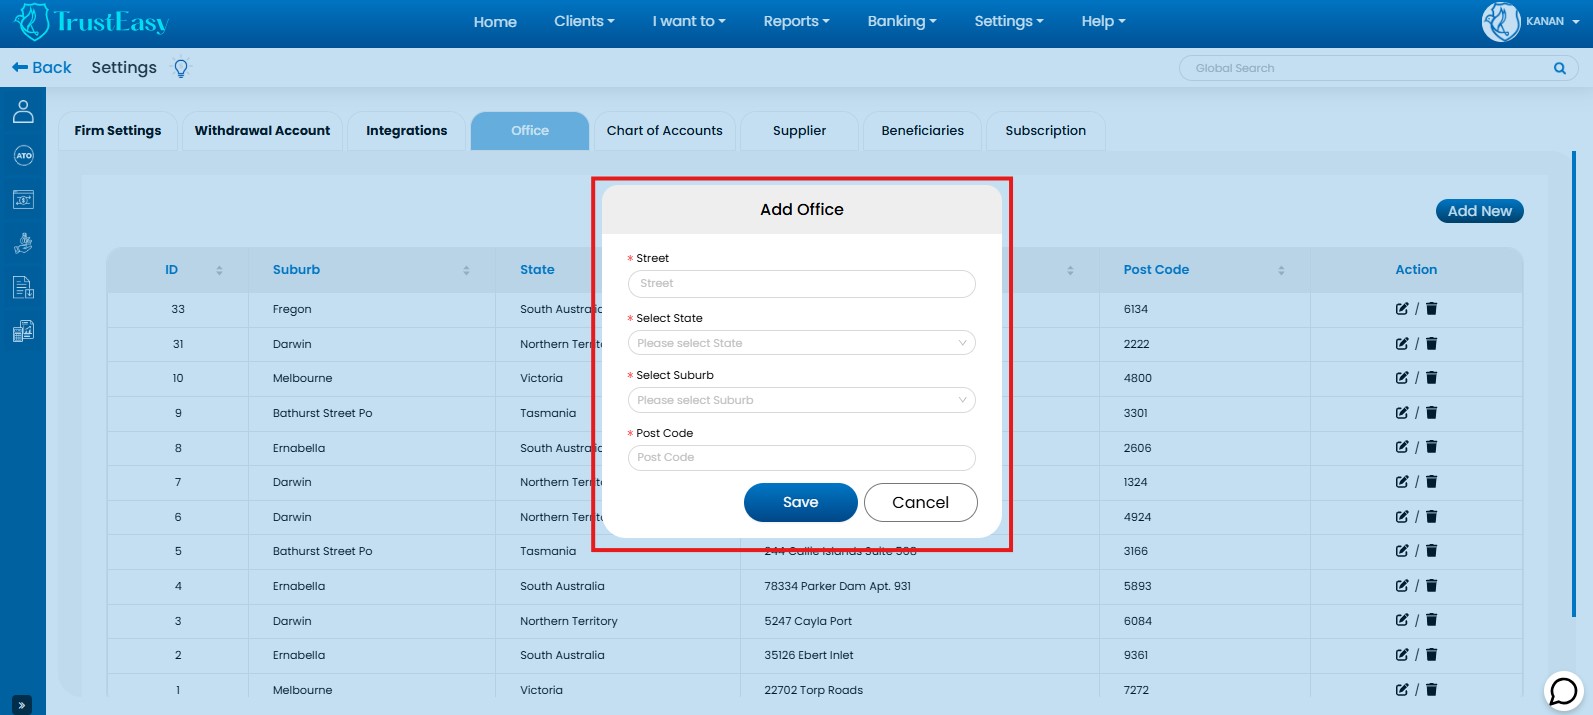
By entering multiple office details in TrustEasy, you can manage and keep track of different office locations within your organization. In the client’s history, you will be able to see which office processed the refund in the past.
In order to find the chart of accounts and make changes in standard chart of account please follow these steps:
- Access Settings:Navigate to the “Settings” area then “General Settings” within the TrustEasy application.
- Locate Chart of Accounts:Find and click on the “Chart of Accounts” section within the General settings.
- View Standard Chart of Accounts:Review the standard Chart of Accounts provided by TrustEasy.
- Make Changes:
- Add new accounts.
- Delete existing accounts.
- Edit account details.
- Specify GST applicability for each account.

Important Considerations:
- Statutory Trust Account:TrustEasy is designed for managing a statutory trust account. Ensure that account entries reflect this specific account type. “Funds Held in Trust” is typically a pre-filled account for reconciliation purposes.
- Bank Charges :Verify with your bank that charges for a trust account are not applied directly to the trust account itself.
- APSEB Guidance:Refer to the APSEB sample letter for opening a trust bank account to ensure the account is correctly established.
By following these steps, you can effectively manage and customize the Chart of Accounts within TrustEasy to meet your specific accounting needs.
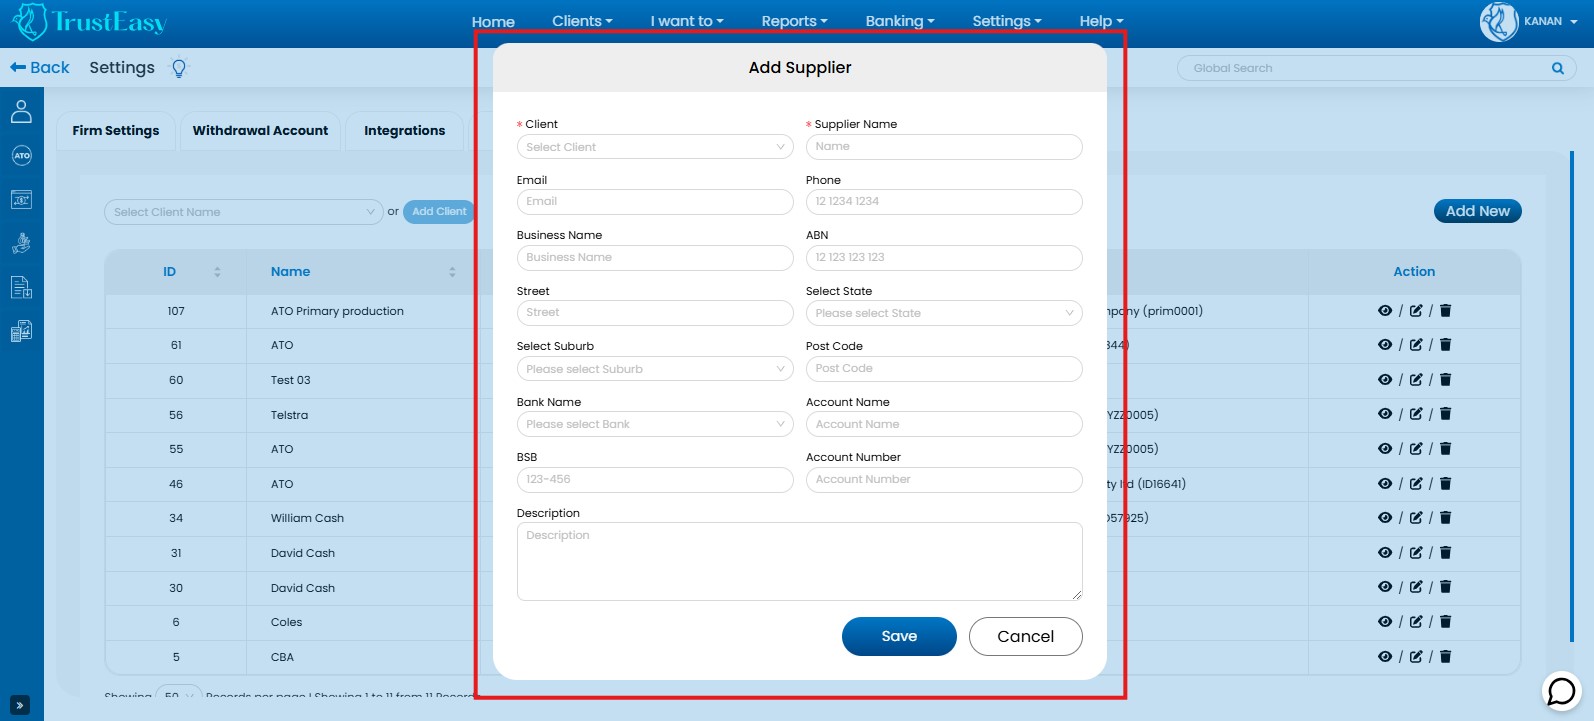
By entering supplier information into TrustEasy, you can enhance the efficiency and accuracy of your financial management processes. To enter the supplier’s information please follow these steps:
- Access Settings:Go to “Settings” and then the “General Settings” within the TrustEasy application.
- Navigate to Supplier Information:Within “General Settings”, find and select the “Suppliers” tab or section.
- Enter Supplier Details:Enter the following information for each supplier:
- Supplier Name
- ABN / ACN (if applicable)
- Business Name
- Contact Person
- Phone Number
- Email Address
- Other relevant Details (as needed)
Note:
- Entering supplier details is optional but recommended for improved record-keeping and streamlined financial management within TrustEasy.
- I while BPAY payments to the ATO can be made as usual, It’s crucial to record these transactions within TrustEasy for accurate financial records.
TrustEasy provides a streamlined process for entering trust payments and receipts:
- Trust Payments:
- Navigate to “I want to” > “Enter Trust Payments”.
- Enter payment details: amount, payee, date, and notes.
- Add beneficiary details if applicable.
- An.ABA file is generated for electronic funds transfer.

- Trust Receipts:
- Go to “I want to” > ”Enter Trust Receipts”.
- Enter receipt details: amount, payer, date, and notes.

By utilizing these dedicated features, you can efficiently record trust transactions within TrustEasy, ensuring accurate accounting and reconciliation. This is particularly helpful when dealing with refunds or payments to entities like the ATO.
- Log in to your TrustEasy account.
- Go to “Settings” from the top menu.
- Select “General Settings”.
- Click on the “Subscription” tab.
- Review your subscription details: This includes your plan, renewal date, and billing information.
- Explore plan options: If you wish to change your plan, navigate to the relevant section within the Subscription settings.
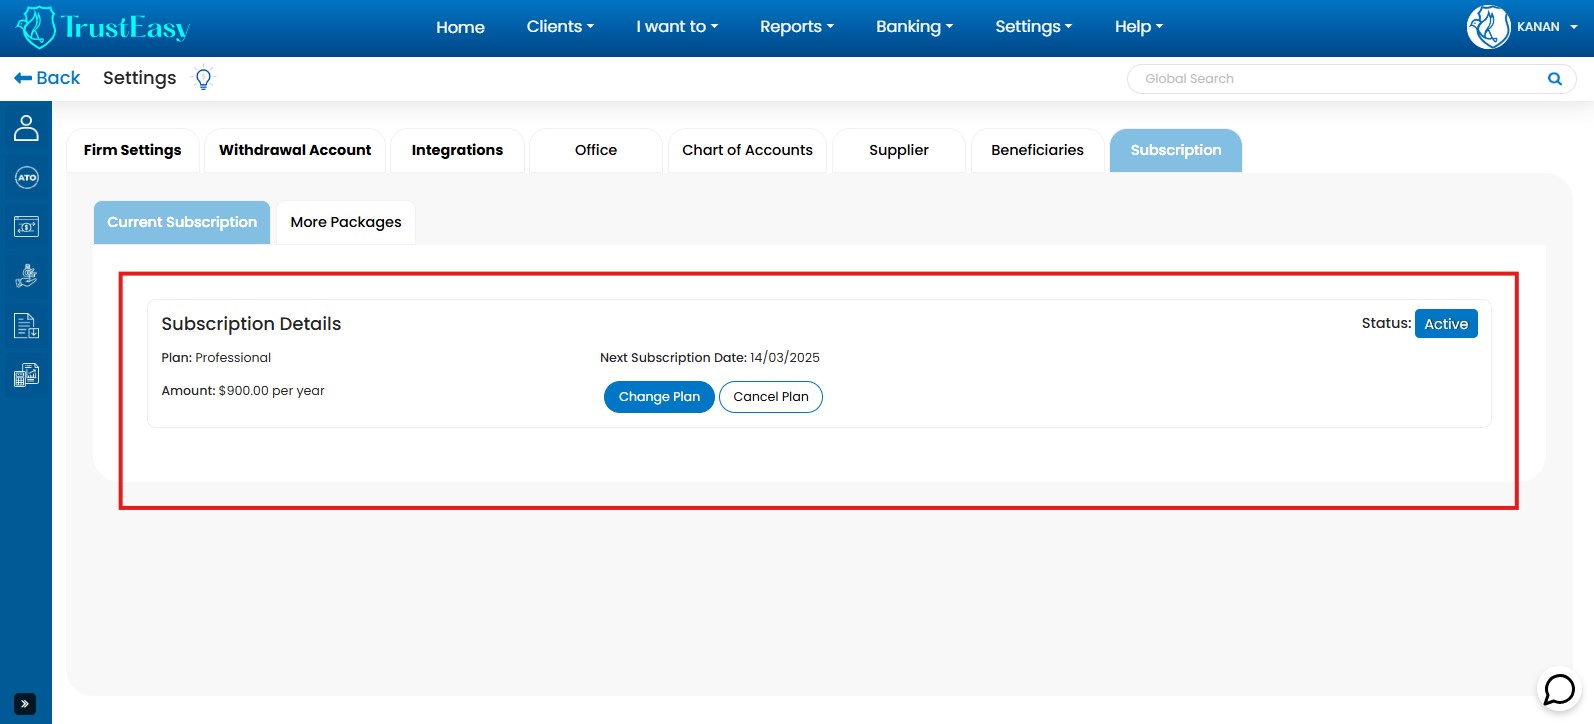
For further assistance: Contact TrustEasy support for any questions or issues regarding your subscription.
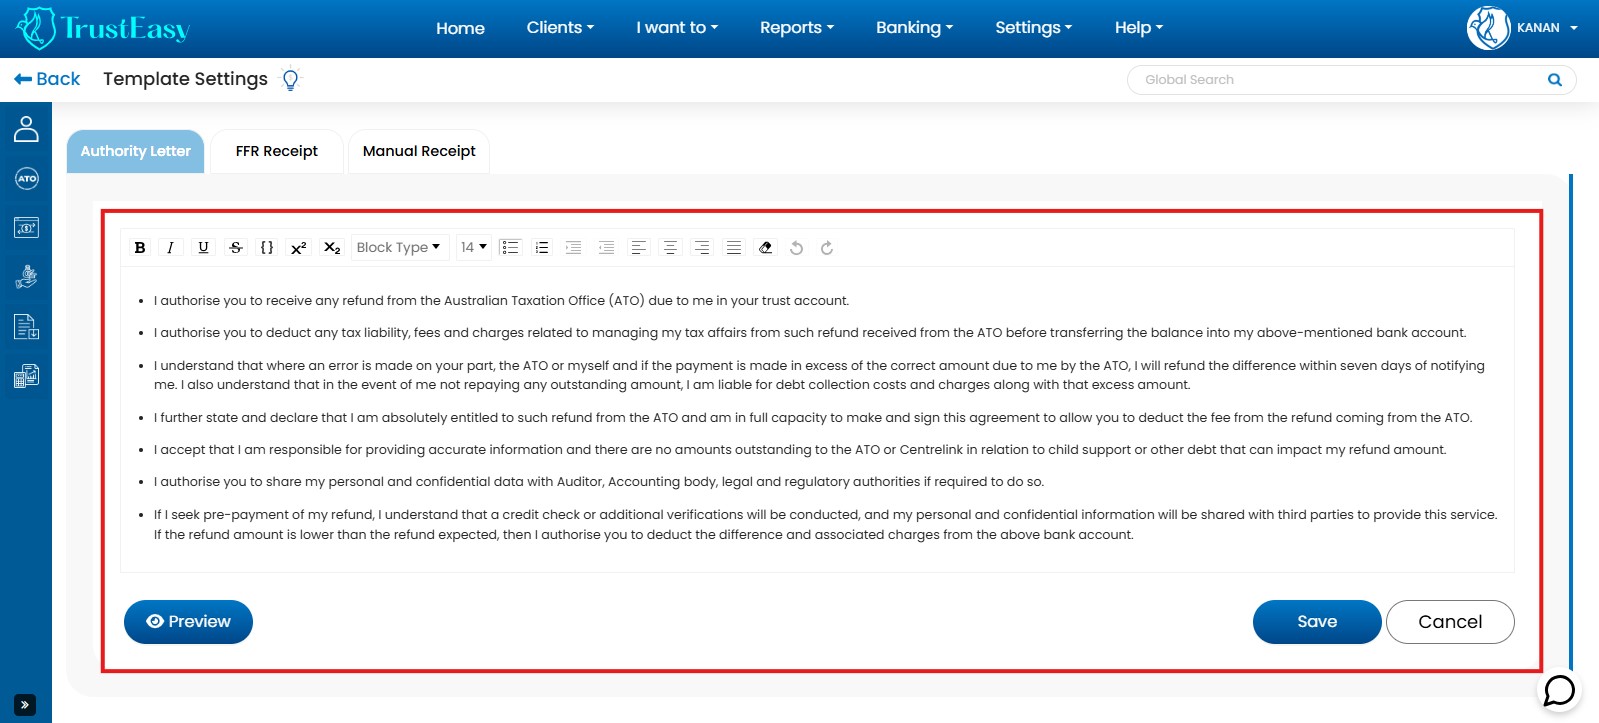
For generating the authority letters as well as making a change in that then please follow these steps :
- Generating Authority Letters:To generate an authority letter for a client, navigate to the client list and select the desired client by clicking on the view/ eye icon on the right side.
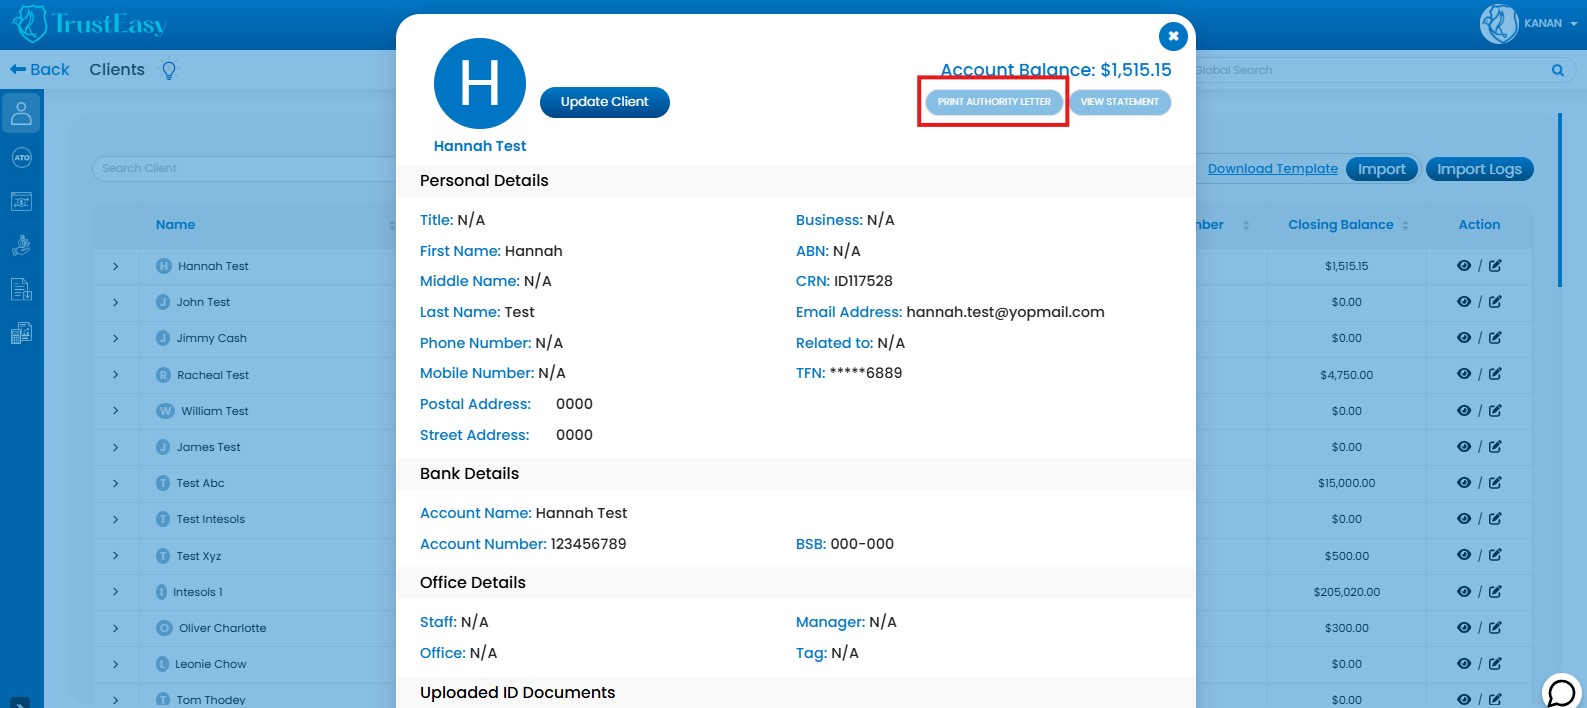
- Customizing Letter Content:Access Template Settings: Go to “Settings” -> “Template Settings” to customize the authority letter template.
- Access Settings:Go to “Settings” within the TrustEasy application.
- Select User Console:Navigate to the “User Console” option within the Settings menu.
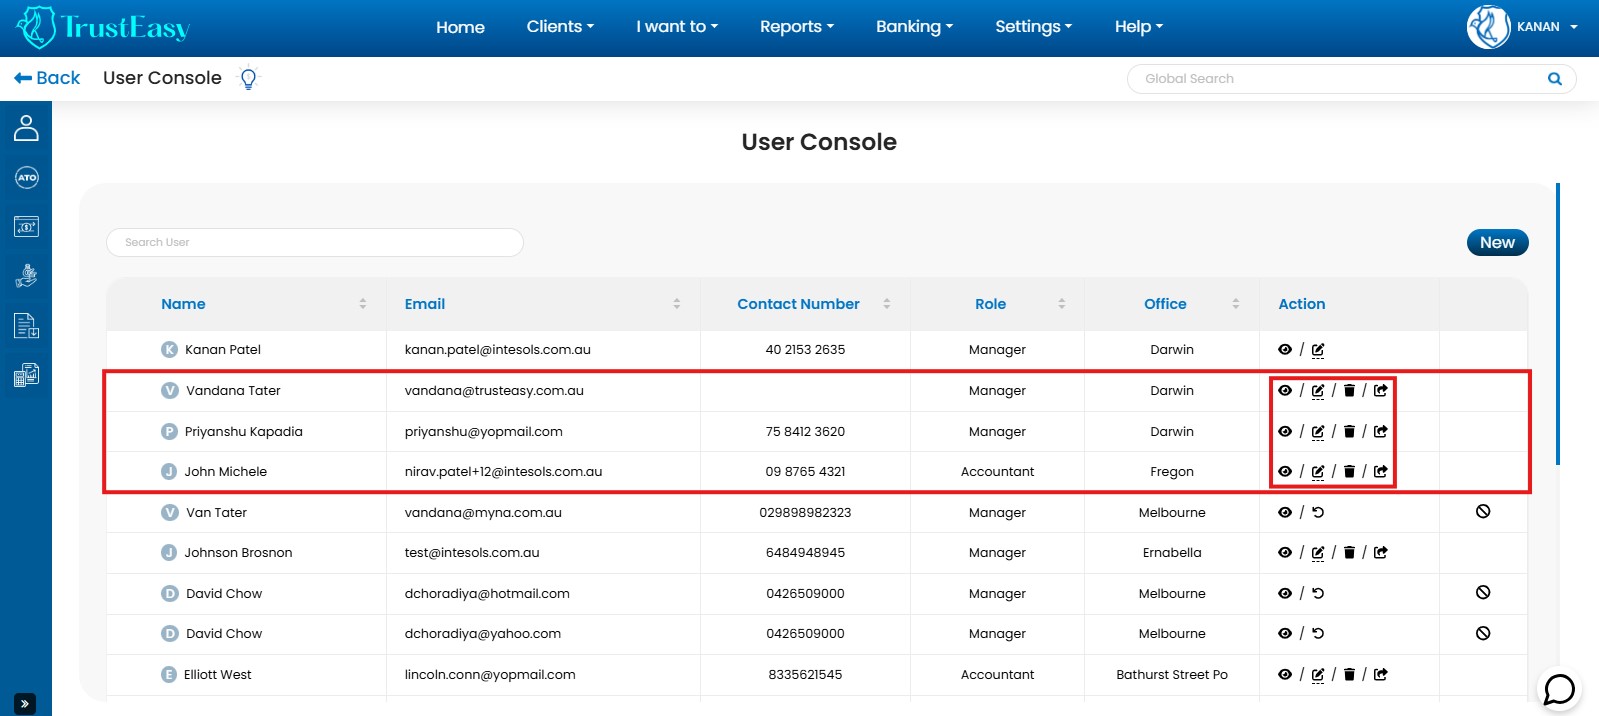
User Management:
- Add New User:Click “New” to add a new user and configure their access permissions.
- Edit User:Modify user details, permissions, and MFA settings.
- Archive User:Deactivate a user’s account(can be reactivated later.)
- Resend Activation Email:Resend the activation email to a user if they haven’t received it.
To reassign a task to a specific user or team member in TrustEasy, you can follow these steps:
- Go to the dashboard:Navigate to the dashboard where you can view all the clients and their refund stages represented by labels.
- Locate the client or task:Identify the client or task that you want to reassign to a particular team member.
- Access the assignment options:On the label representing the task, you will find an area typically labeled “Assigned to N/A” by default. Click on the three-dot menu located within this area.
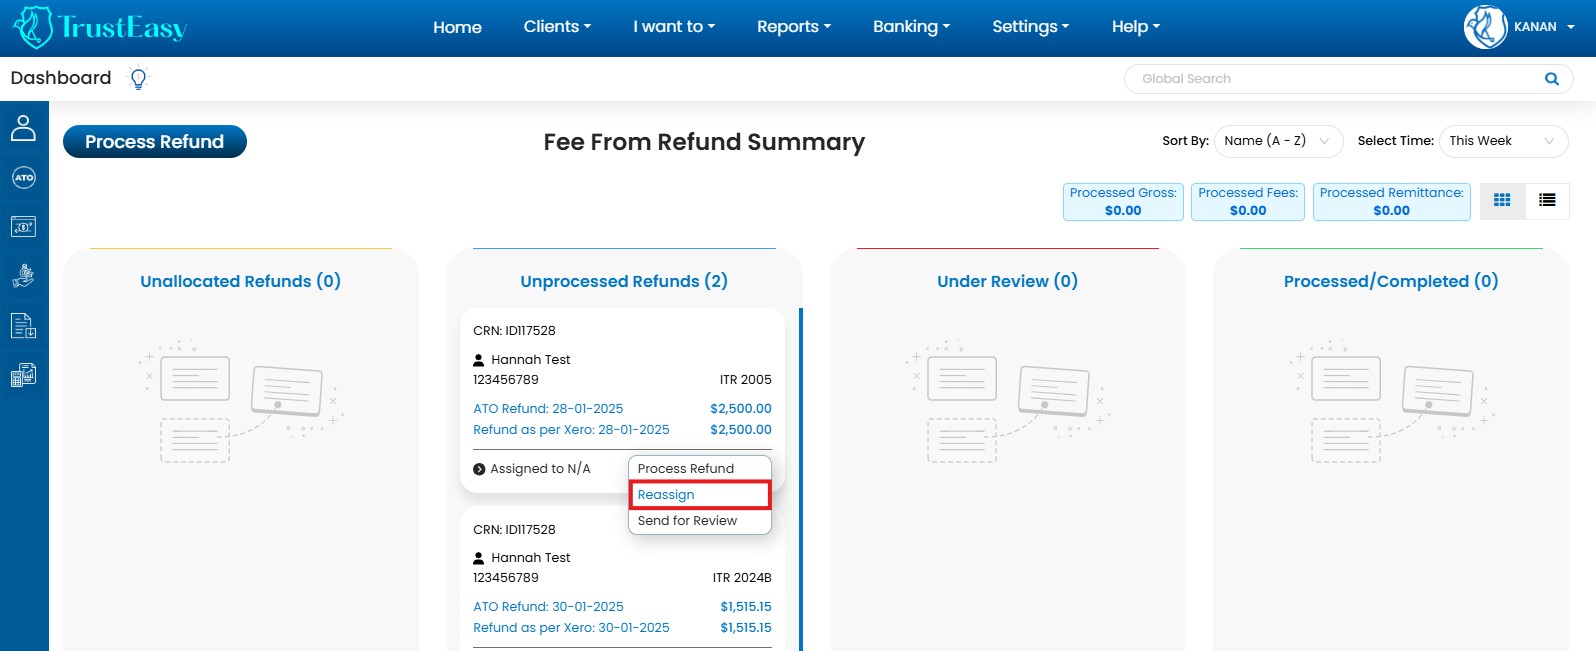
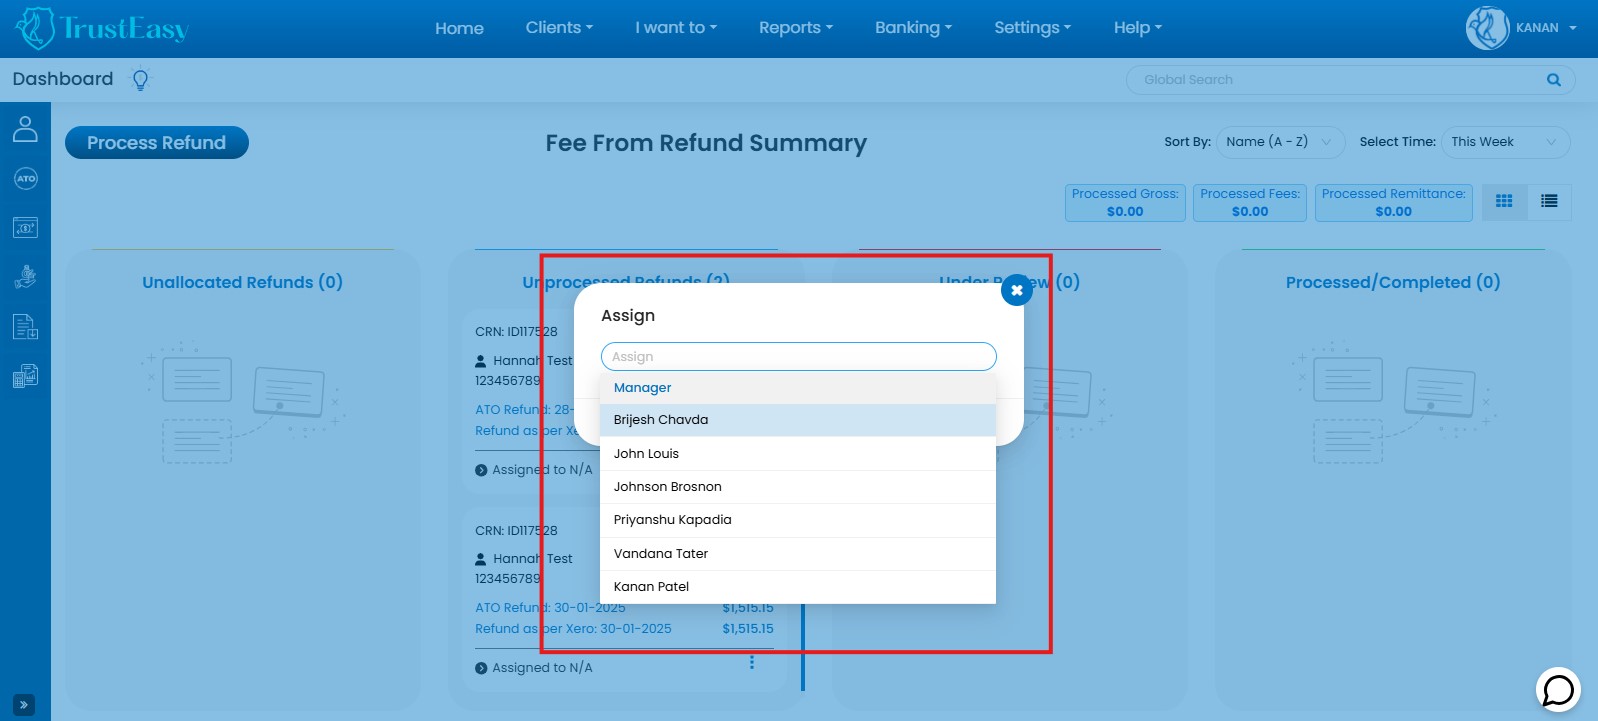
- Select the assignee:From the menu options that appear, choose the option to assign the label to a team member/user. A list of users that you have previously entered in the TrustEasy settings will be displayed. Select the appropriate team member from the list.
- Confirm the reassignment:Once you select the team member, the task will be reassigned to the team. Their name will then replace “Assigned to N/A” on the label.
By reassigning tasks, you can effectively distribute the workload among your team members and efficiently track the progress of each assigned task.
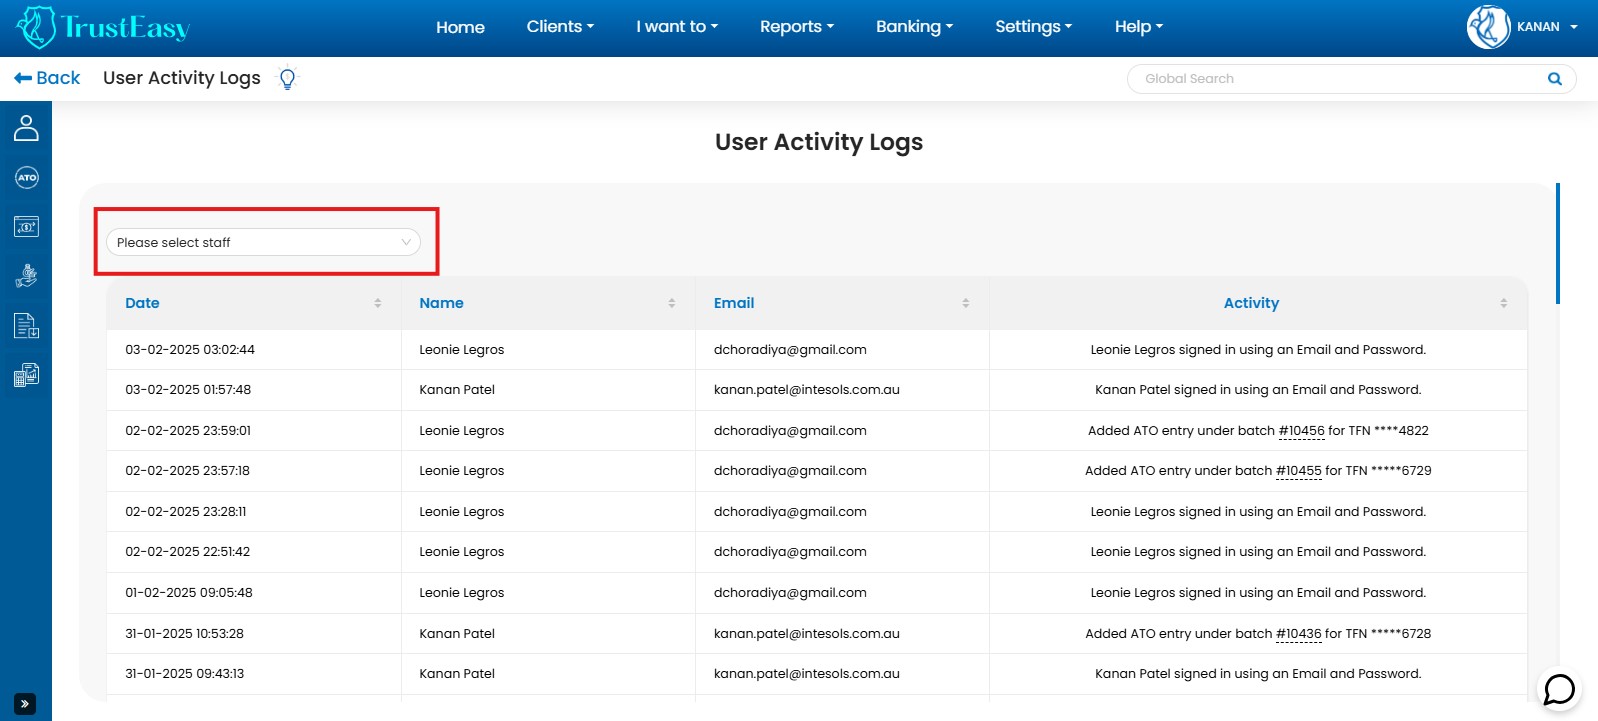
In TrustEasy, you can view your team member’s activity history using the following steps:
- Navigate to the ”Settings” option in the top menu.
- Click on ”User Activity Log”.
- This page displays all member’s activity history, organized by time and date.
- To view a specific person’s activity, use the search option to find their name. The results will then show the activity history for that individual.
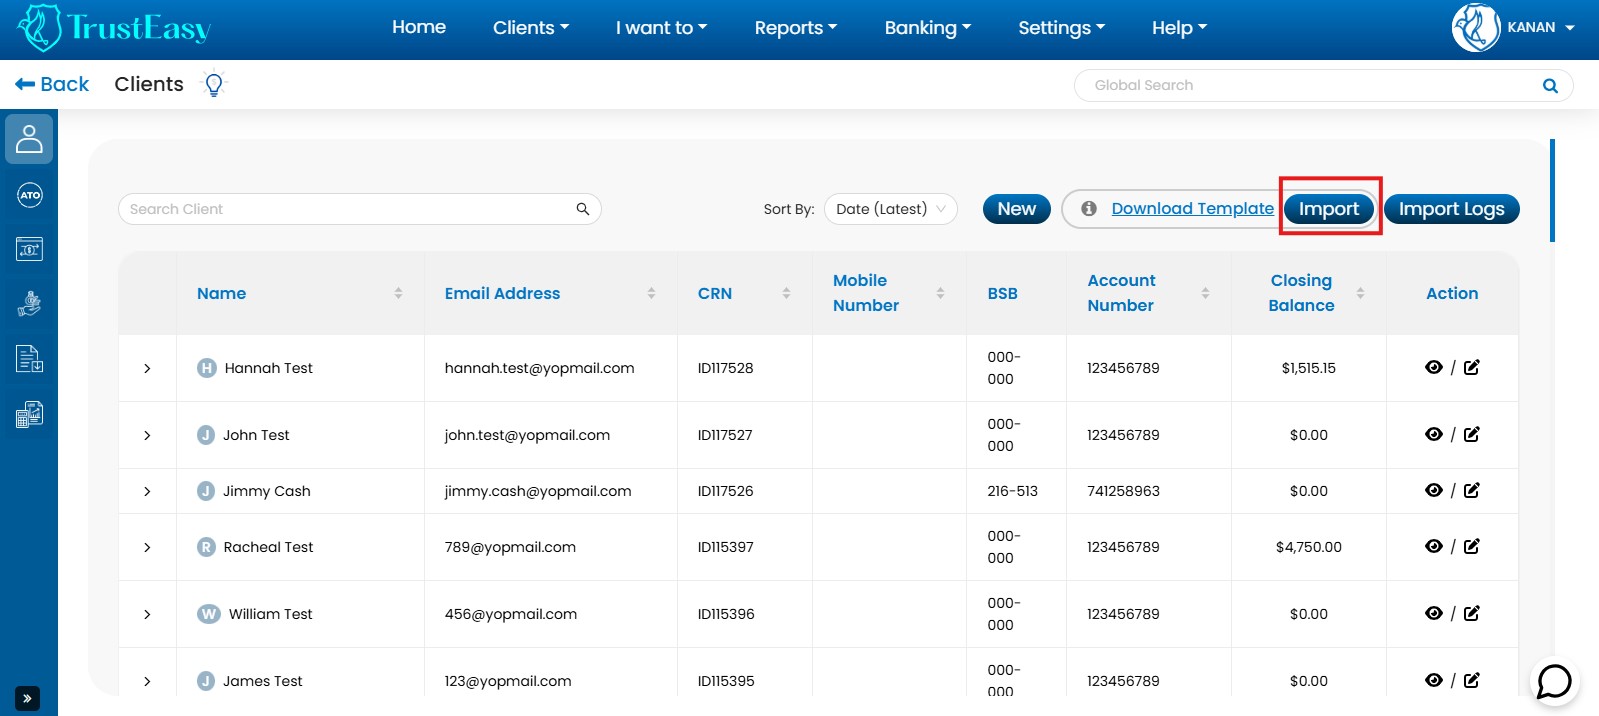
Under the client’s section, there will be an Import button, where you can upload the client’s data either from the cloud base CRM software or there will be one ready-made .csv/excel template available in the Client’s page. you will need to download it and manually edit it and upload it back in the TrustEasy for uploading the client’s data from the desktop base software.
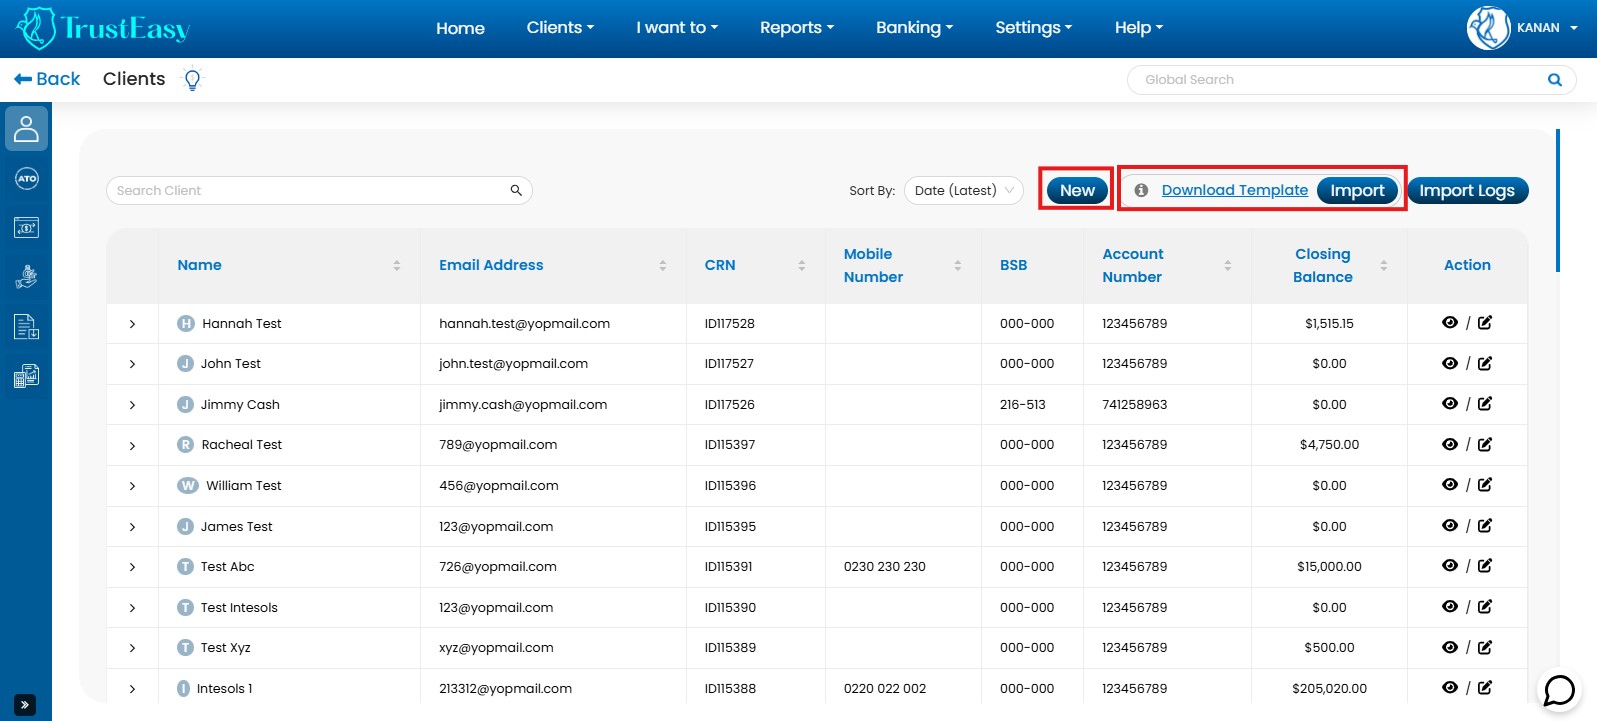
To upload the .csv file please follow these steps:
- Navigate to “Clients” from the first option in the left sidebar.
- Look for the “Import” button.
- Once click on Import there will be drag and drop option available for you where you will need to upload the file.
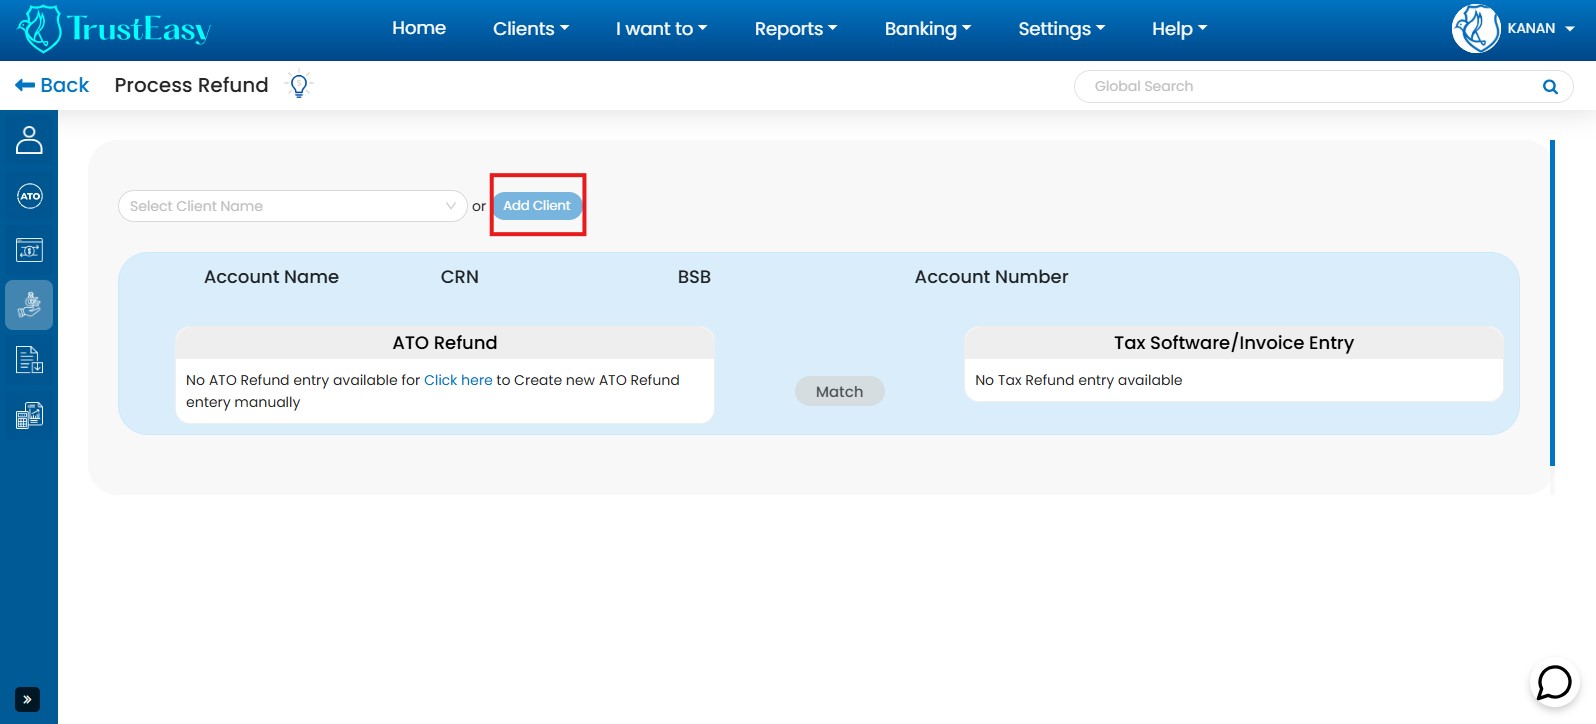
Aside from retrieving client data directly from your CRM, there are other ways to input client information into the system. One such method is encountered during the process refund procedure. If a client is not properly registered, you can navigate to the process refund page and click on the “New” tab to add the client manually within the TrustEasy system.
To get the Client history of refunds you can follow these steps:
- Navigate to Clients:Go to the “Clients” section within TrustEasy.
- Find the Clients:
- Search for the specific client using the search function.
- Click on the “>” symbol next to the client’s name to expand their details.
- View Client History:The expanded view will display the client’s history, including a list of processed tax returns.
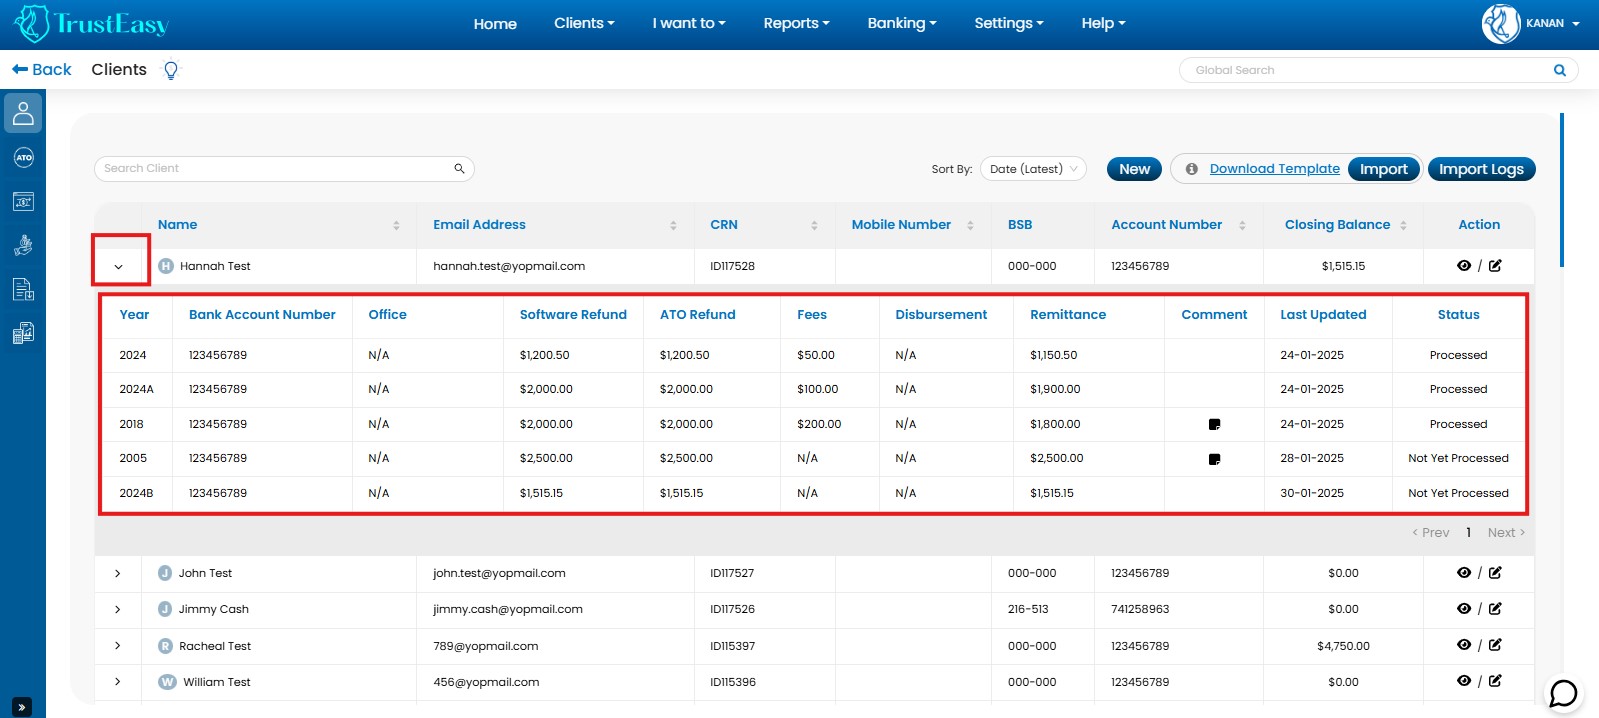
- Review Refund Details:This list will provide information on each refund, such as :
- Refund amount
- Date of processing
- Status (processed or pending)
By following these steps, you can easily access and review the refund history for any specific client within the TrustEasy system.
- Navigate to Clients:Go to the “Clients” tab within the TrustEasy software.
- Click New:Click the “New” button to create a new client entry.
- Enter Essential Information:
- Mandatory Fields:Enter the client’s First Name, Last Name, Tax File Number(TFN), and Email Address.
- Recommended:Enter the client’s bank details for seamless .aba file generation for net refunds.

This guide outlines the basic steps for manually entering client information within the TrustEasy platform.
KYC (Know Your Client) is a critical process that involves verifying and collecting essential information about clients to comply with legal and regulatory requirements.
In TrustEasy, KYC involves verifying client identity and relevant details before providing tax agent services and Business Activity Statement(BAS) services. This process adheres to the strict guidelines set forth by the Tax Practitioners Board (TPB).
To manage KYC in TrustEasy:
- Access Client Profile:Go to the client’s profile within the TrustEasy software.
- Enter Client Information:Enter the required client details, such as name, address, contact information, and identification numbers.
- Select Appropriate Options:Choose the correct options for identification documents(e.g, driver’s license, passport) based on the TPB’s guidelines.
- Upload Documents:Upload copies of identification documents if necessary.
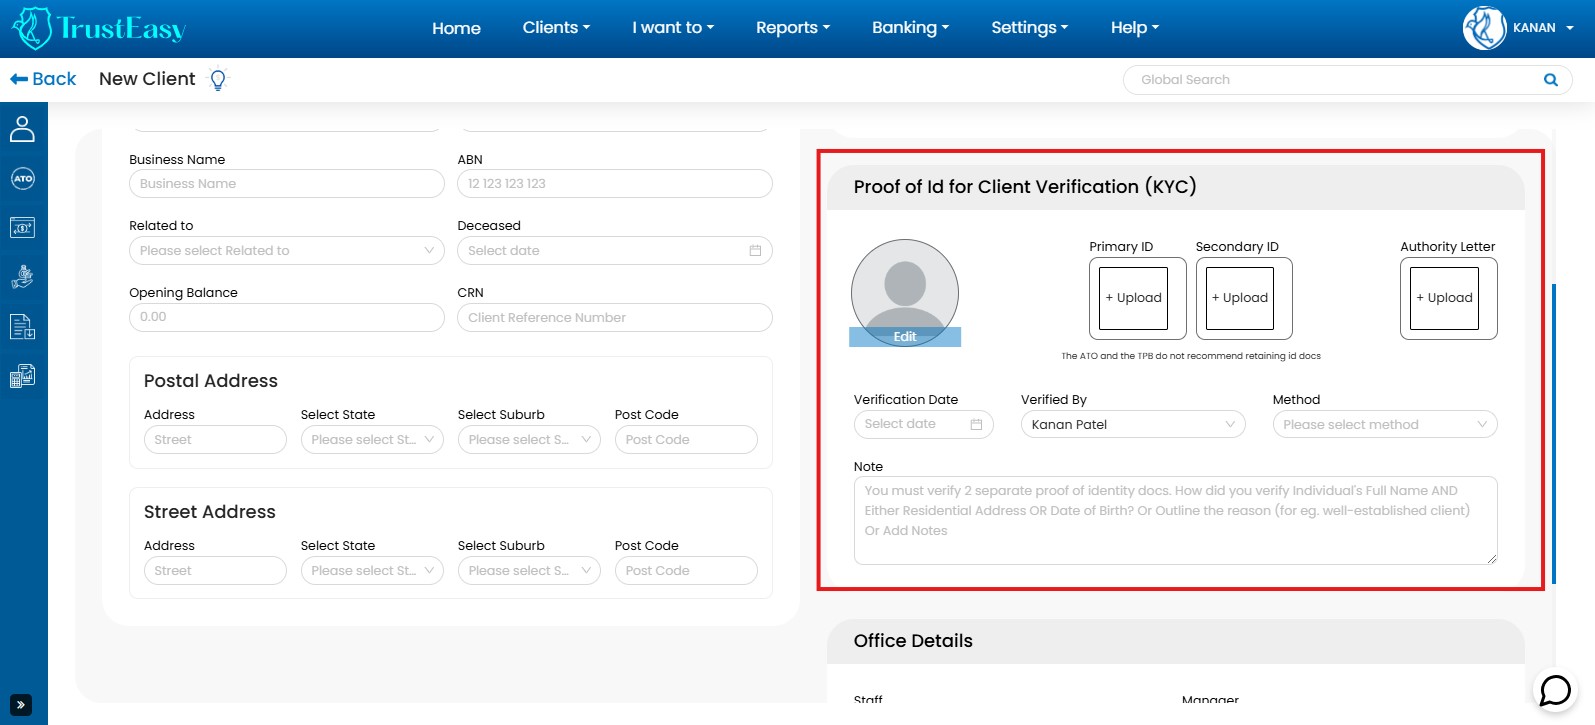
By effectively managing KYC within TrustEasy, you ensure compliance with TPB regulations, maintain accurate client records, and uphold the integrity of your tax agent and BAS services.
In order to find the list of archived clients you will need to follow these steps:
Archived Clients:
- Navigate to the “Clients” section in the top menu of TrustEasy.
- Select the “Archived Clients” option from menu.

- This option will display a list of all the clients that have been archived within the system.
Due to security restrictions, Xero and Salesforce do not display full TFNs within TrustEasy. Therefore, you must manually update them.
Follow these steps:
- Navigate to “Clients” from the top menu.
- Select “Update the TFNs”.
- Download the provided template.
- Enter all the required information, including the complete TFNs, into the template.
- Upload the completed template back into TrustEasy by clicking “Import” and then using the drag-and-drop option.
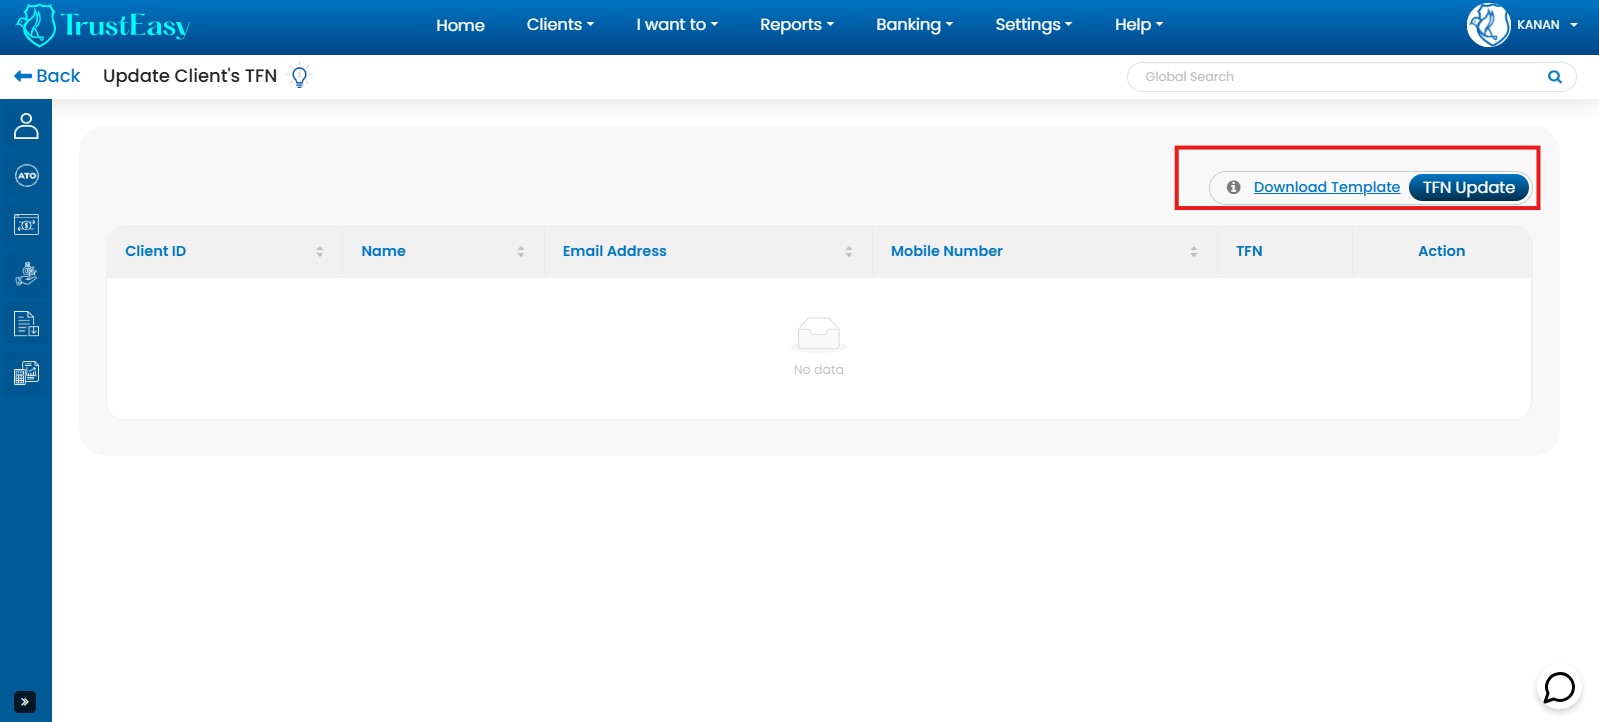
These steps will update all client TFNs within the system.
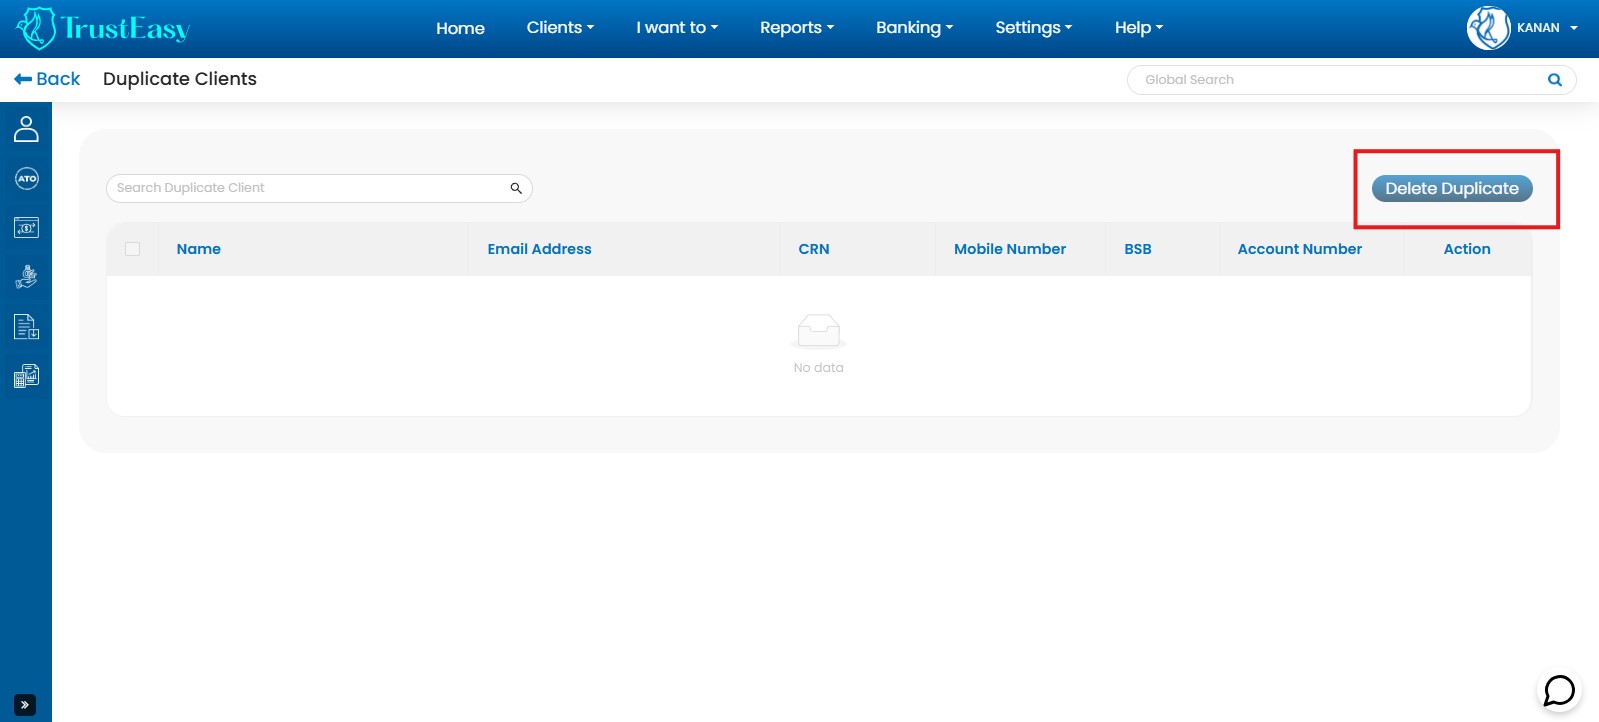
In TrustEasy when you import the client data from the Xero and Salesforce then TurstEasy will automatically identify the duplicate entries of clients and those list of clients will be placed in the Duplicate client’s entries. For getting those duplicate client’s list please follow these steps:
- Navigate to “Clients” from the top menu.
- Then select the “Duplicate Clients”.
- Once you get the list of clients then you can delete those duplicate entries from selecting “Delete Duplicate”.
While the “Process Refund” button on the homepage is the most efficient method, you can also manually enter ATO refund data individually.
- Access Refund Entry:
- Option 1:Click on the third icon on the left-side menu labeled “Refund from the ATO”.
- Option 2:Navigate to the top menu, select “I want to”, and choose “Import EFT reconciliation report”. Both options lead to the same location.
- Enter Refund Data:
- Click the “Add Manually” button.
- The system will pre-fill tax return details for your convenience.
- Enter the necessary refund information manually.
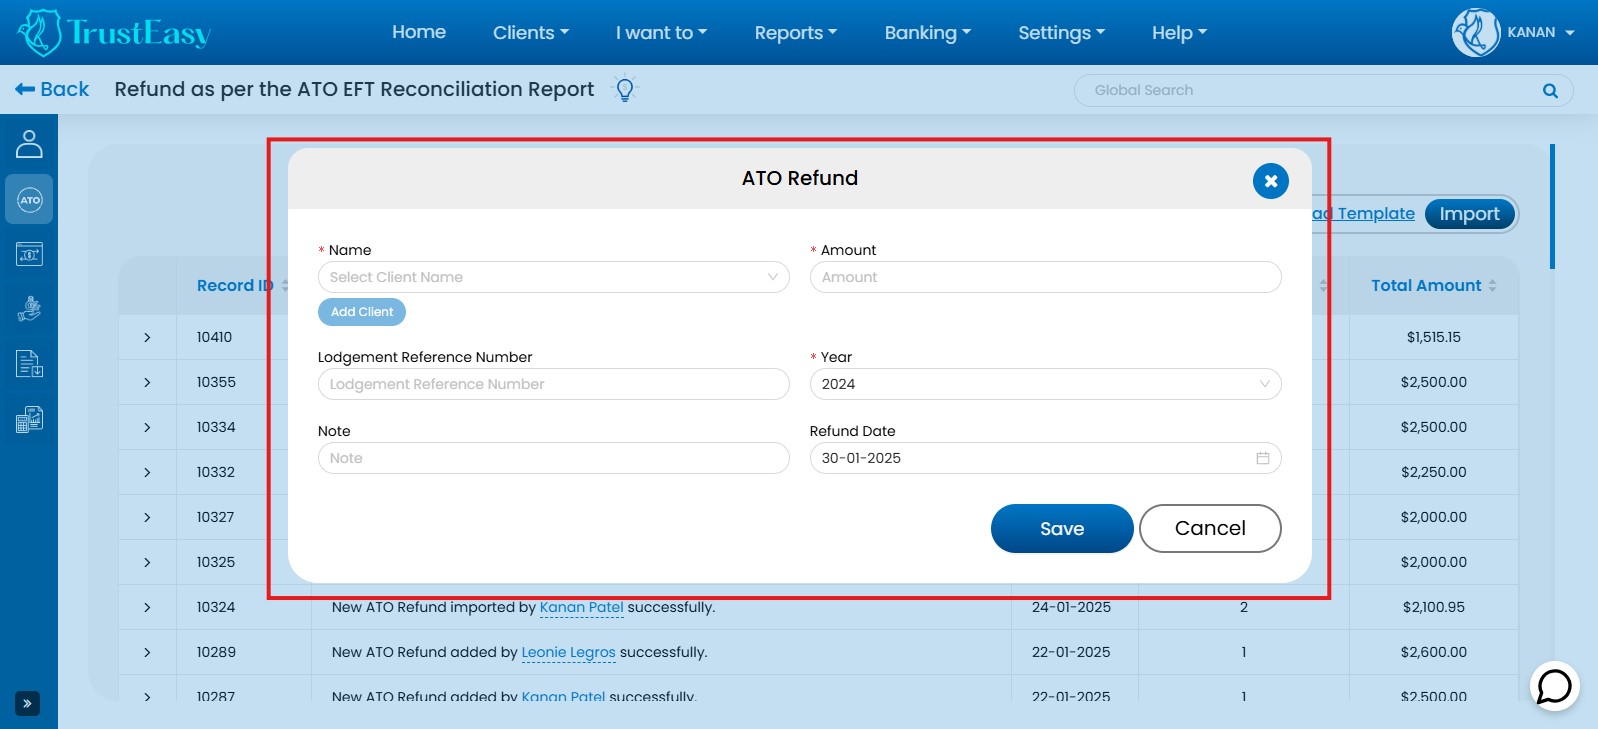
This manual method allows for individual entry of ATO refund data while still benefiting from pre-filled tax return details.
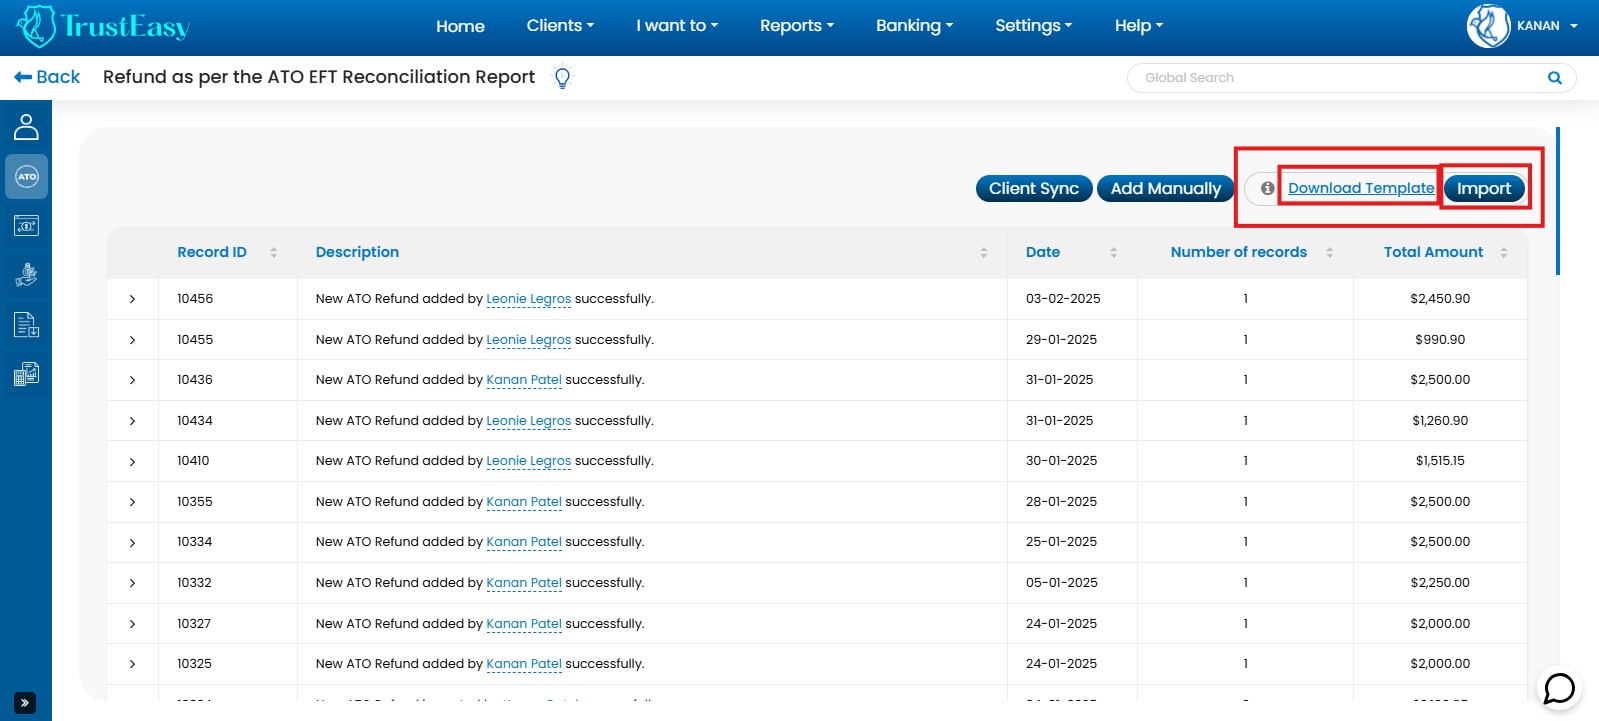
To import the ATO EFT reconciliation report in TrustEasy please follow the process :
- Obtain the Report:Request and obtain the EFT Reconciliation Report from your tax lodgement software.
- Prepare the Data:
- Copy the Report:Copy the contents of the EFT Reconciliation Report.
- Paste into Excel/CSV Template:Paste the copied data into a new Excel or CSV file which is ready-made available in TrustEasy under the Refund from ATO.
- Format:Format the data in the TrustEasy-specific format. This format is available on the “ATO Refund” section of the TrustEasy website.
- Import into TrustEasy:
- Import the formatted Excel/CSV file into the TrustEasy system.
- Follow the on-screen instructions within TrustEasy to complete the import process.
This method allows you to efficiently import ATO EFT Reconciliation Reports into TrustEasy for further processing and reconciliation within the system.
NOTE:Always refer to the specific instructions and guidelines provided by TrustEasy for the most accurate and up-to-date import procedures.
To process refunds in bulk, you’ll need to import data in two steps:
- EFT Reconciliation Report:Download the EFT Reconciliation Report from your tax lodgement software. This report is essential for reconciling refund amount.
- Import EFT Reconciliation Report:Once you download the EFT report from the Tax lodgement software then please download our ready made template from the TrustEasy by going to the “Refund from ATO” tab. Then complete all the information which has been asked according to the EFT Reconciliation report. And then import it to the TrustEasy.
Once the EFT Reconciliation Report template is successfully imported, you can proceed by clicking on the “Process Refund in Bulk” button. You can access this “Process Refunds in Bulk” function from various locations within the software, such as:
- Third icon on the left-sidebar.
- Under the “I want to” option second option in the main menu.
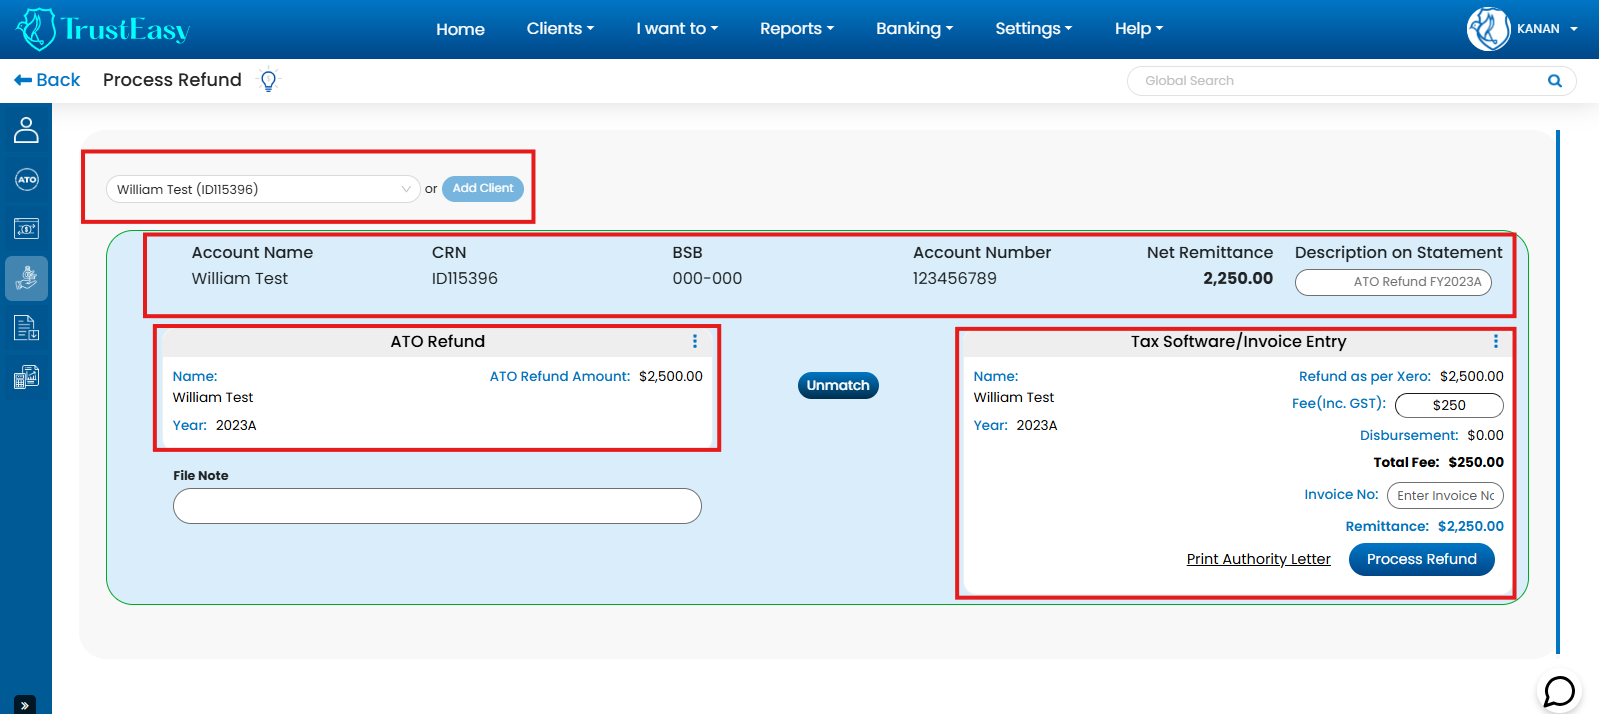
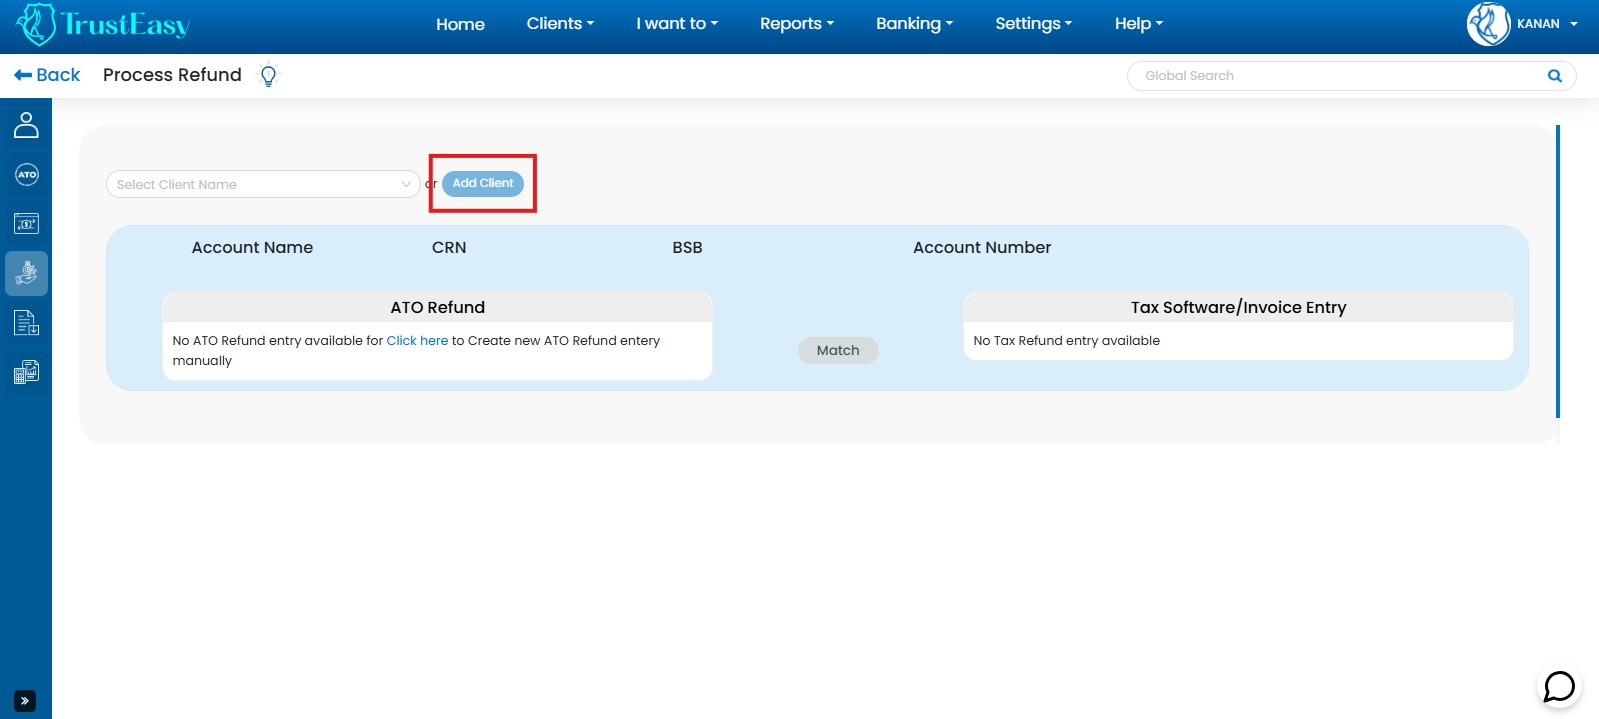
TrustEasy offers two refund options: One-on-One Refunds and Bulk Refunds. For processing individual customer refunds, use the One-on-One Refund process:
- From the “Homepage,” select “Process Refund.”
- Use the search option to select the customer and view their account details.
- In the “ATO REFUND” box, click the “Click HERE” link.
- Enter the refund details.
- Clicking “Save” will automatically populate information into the next box, “TAX Software/Invoice Entry.”
- Enter the “Professional fees.”
- Click “Process Refund.” This will generate an .aba file, which you must download and upload to your online banking system to complete the refund.
The .aba file format is a standard file format used for bulk electronic fund transfers in Australia, as defined by the Australian Banking Association.
Within TrustEasy:
- .ABA File Generation:After processing client refunds, TrustEasy generates raw .aba files for each refund transaction. These files are stored within the “Generate .aba” section under “.ABA Files”.
- Selection and Processing:You can select specific refunds, “undo” certain transactions, or create a bulk .aba file for all processed refunds. Upon clicking “Create .aba file”, TrustEasy generates a consolidated .aba file for the selected refunds.
- Download and Import:Download the generated .aba file to your computer and import it into your online banking system. This initiates the transfer of net refund amounts to clients.
- Fee Withdrawal:TrustEasy automatically generates separate .aba files for your professional fees associated with each refund.
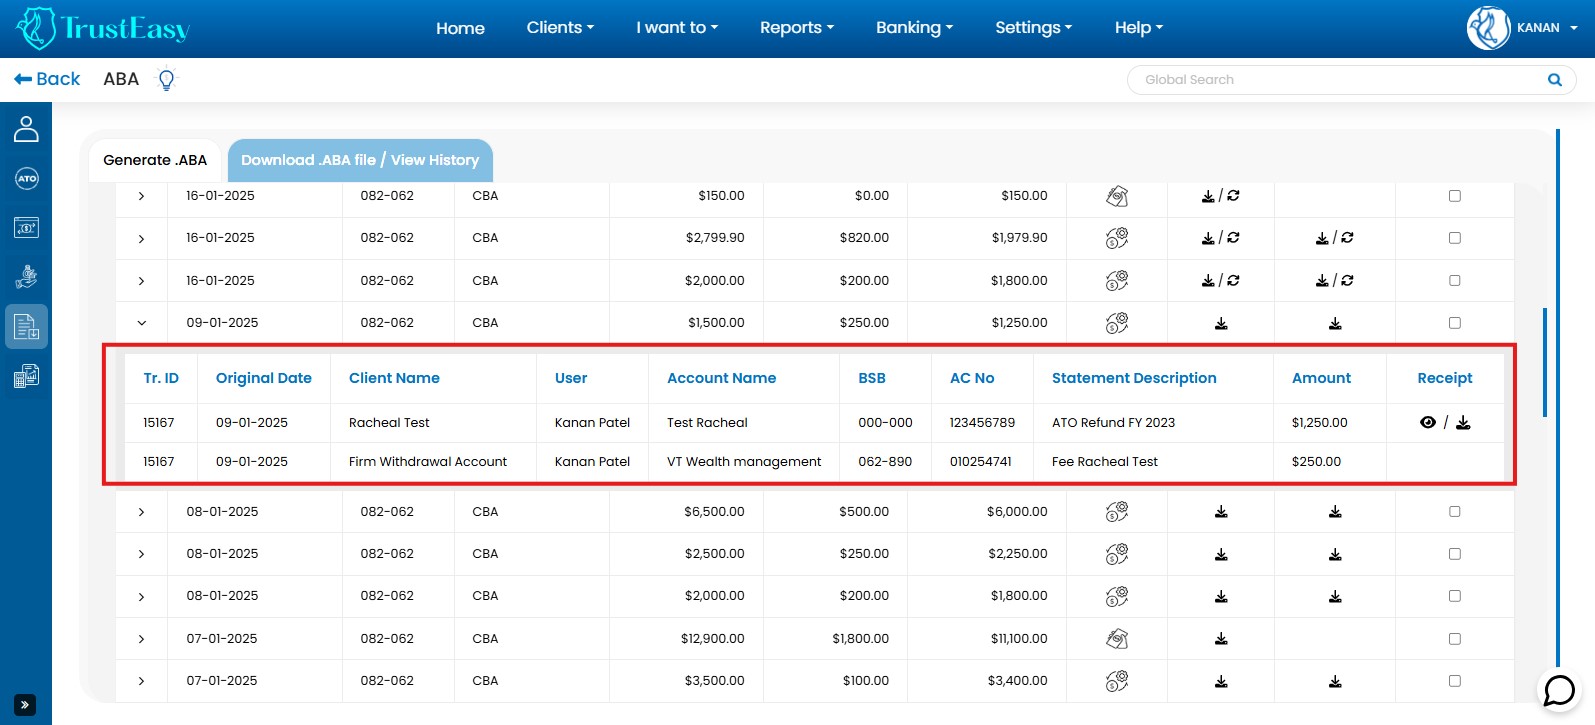
- Fee Transfer:Import these fee-related .aba files into your online banking to transfer fees to your designated withdrawal account.
Prerequisites:
Correct Bank Details:Ensure accurate bank details are entered in the withdrawal accounts section of TrustEasy’s settings. This process streamlines fee collection and client refund disbursements, improving efficiency and accuracy within TrustEasy.
To send the receipt for the ATO refunds please follow these steps :
- Generate Bulk .ABA File:After processing refunds, generate a .aba file by clicking on the “Generate .ABA” button.
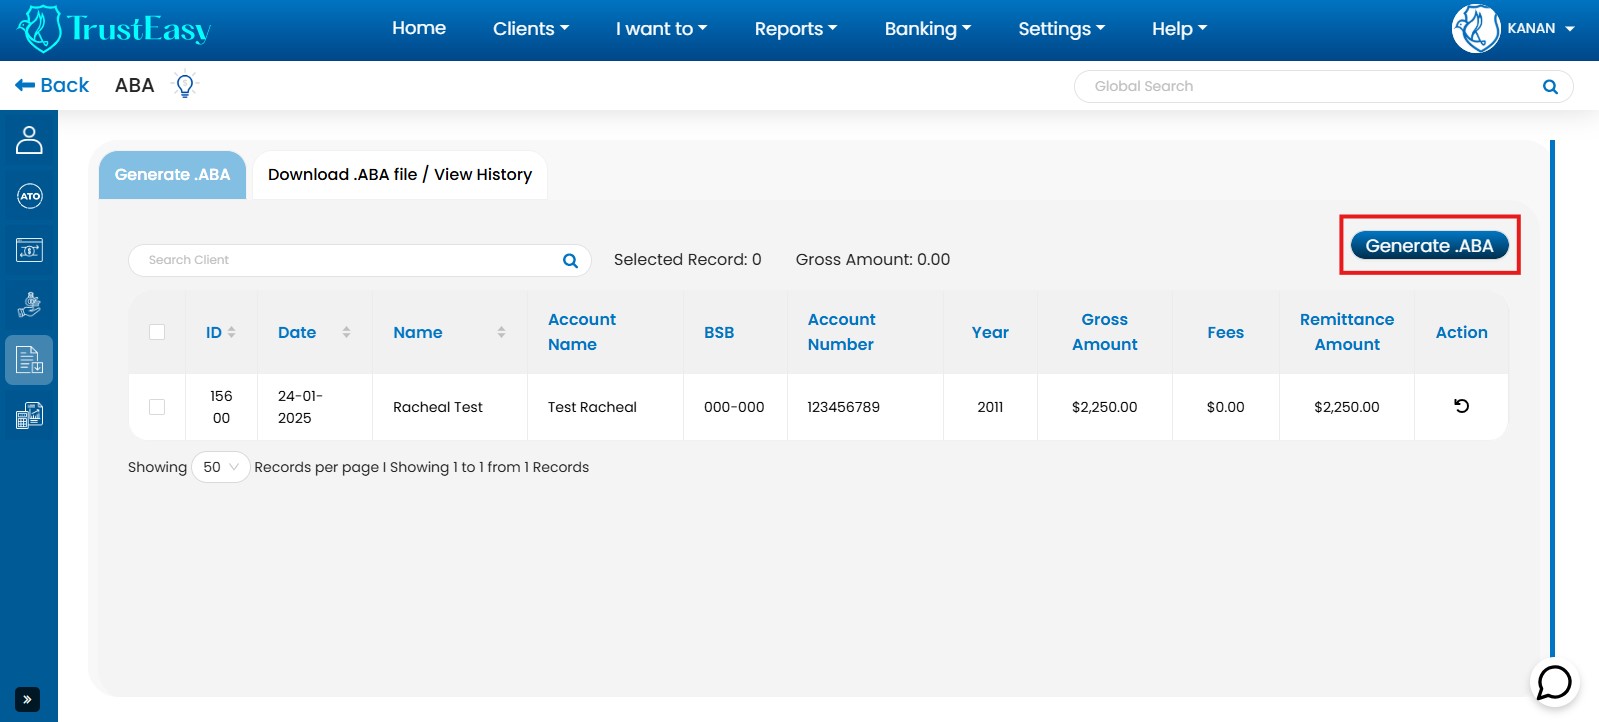
- Receipt Sending Prompt:TrustEasy will prompt you to send an automatic receipt to your clients.
- Send Automatic Receipt:Click “Yes” to send the receipt immediately. TrustEasy will automatically generate and send a receipt to the client’s registered email address.
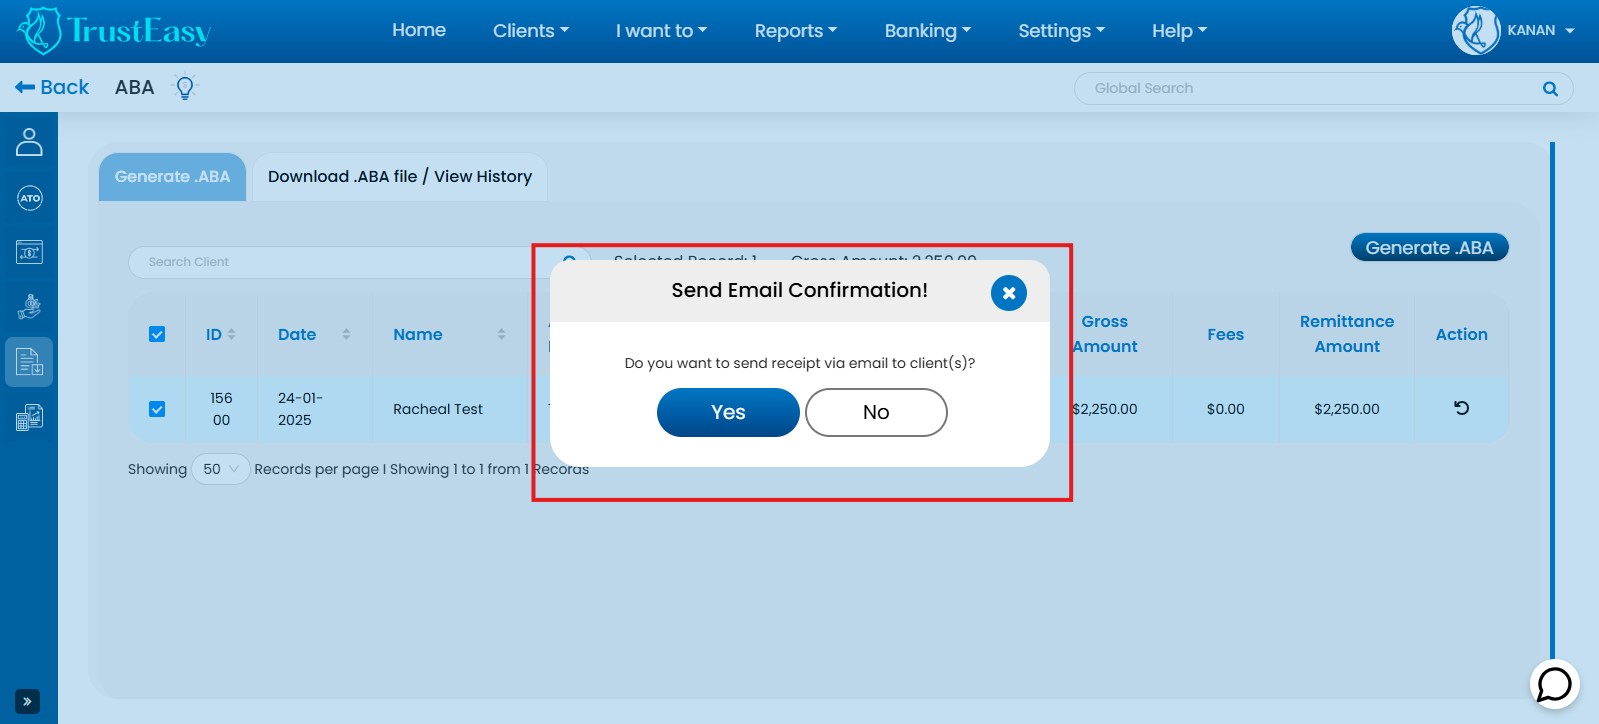
- Postpone Receipt Sending:Click “No” to postpone sending the receipt. You can access and send the receipt later from the .aba file history area.
TrustEasy provides the flexibility to send receipts for ATO refunds immediately or at a later time according to your preference.
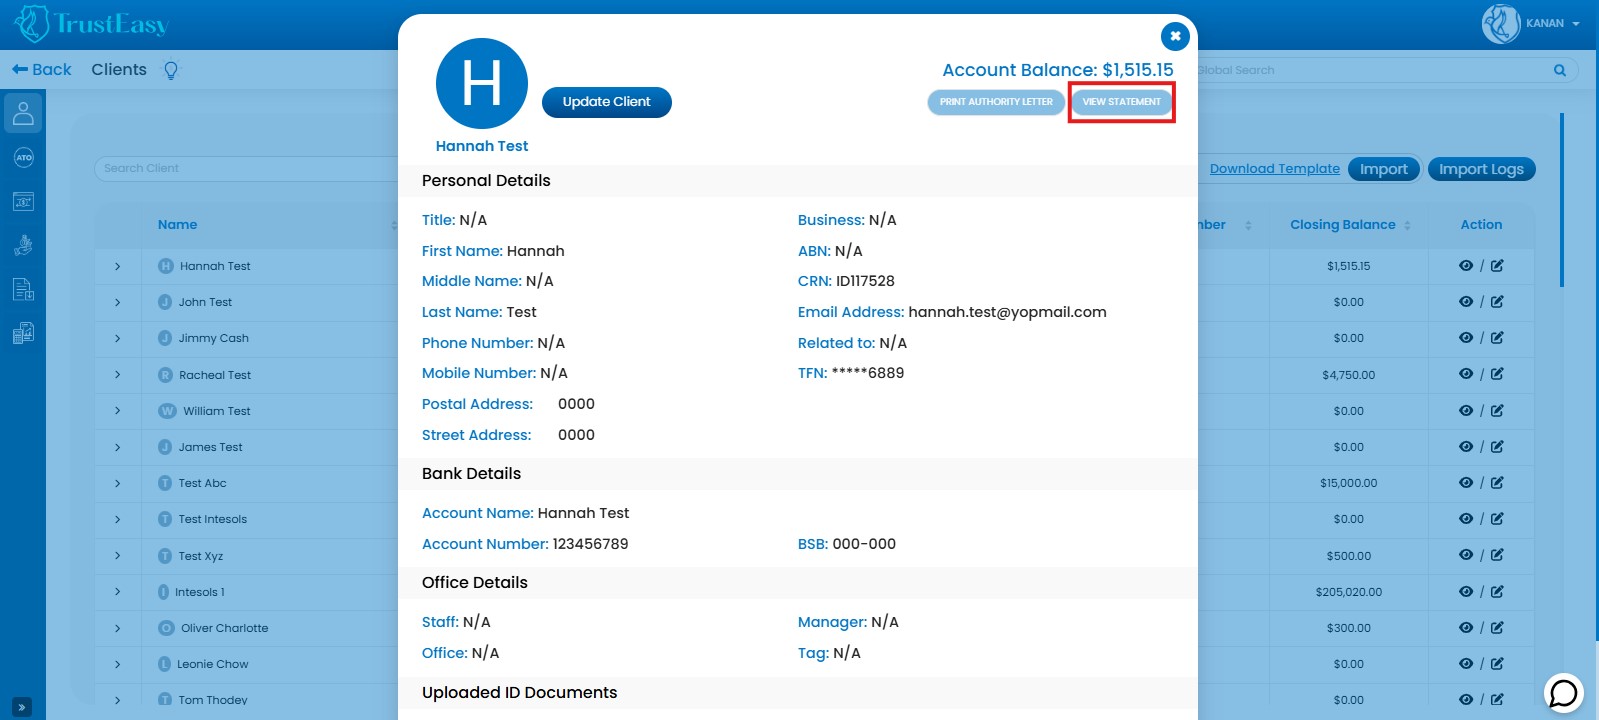
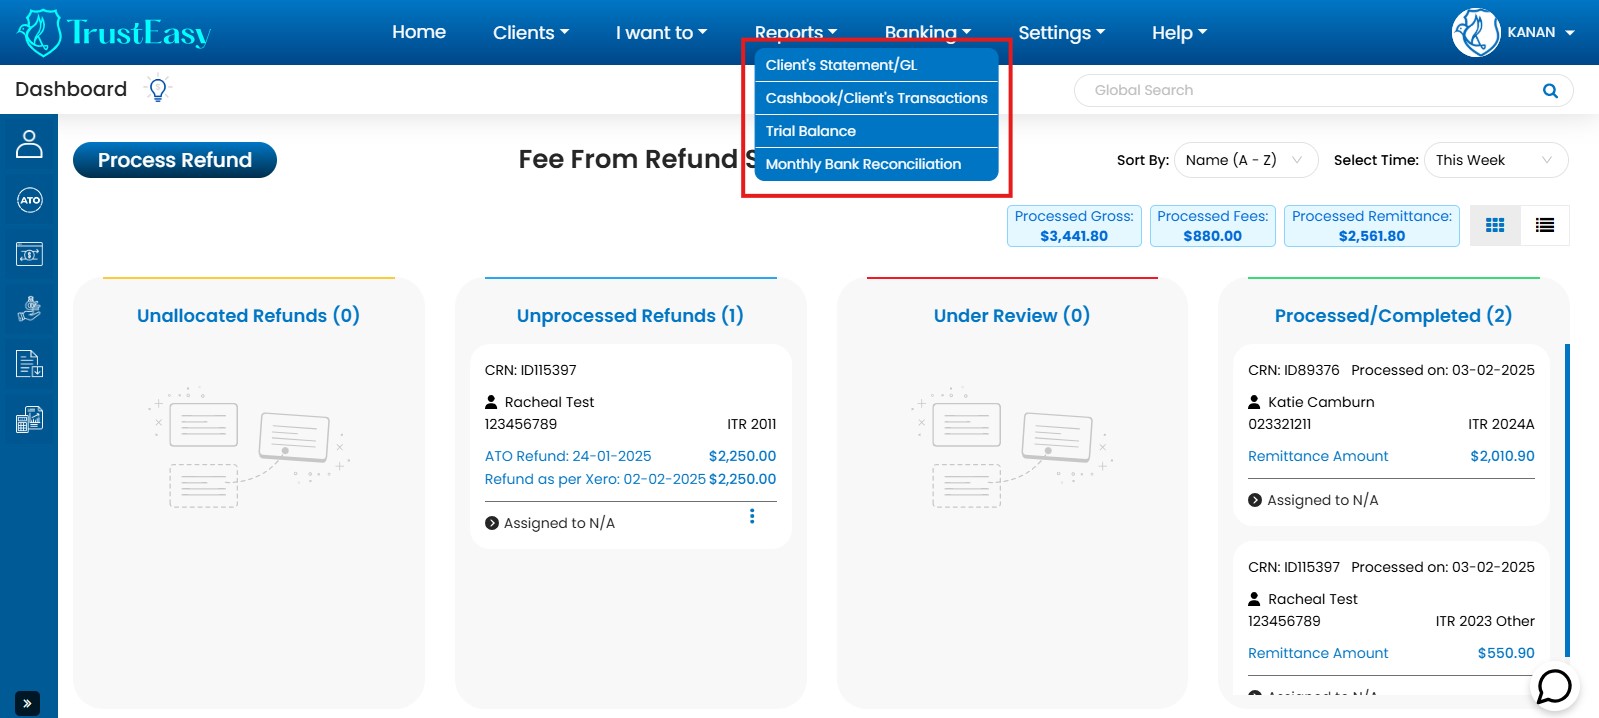
To produce client statements in TrustEasy, you can follow these steps :
- Individual Client Statement:
- Locate Client:Search for and select the desired client from the client list.
- View Statement:Click on the “View Statement” option within the client’s details.
- Multiple Client Statements:
- Access Reports:Go to the “Reports” section.
- Select Client Statement:Choose the “Client Statement” option.
- Select Clients:Choose the desired clients.
- Specify Period:If necessary, select the desired date range for the statements.
- Export/Generate:Click on the “Export” tab or the relevant button to generate the selected client statements.
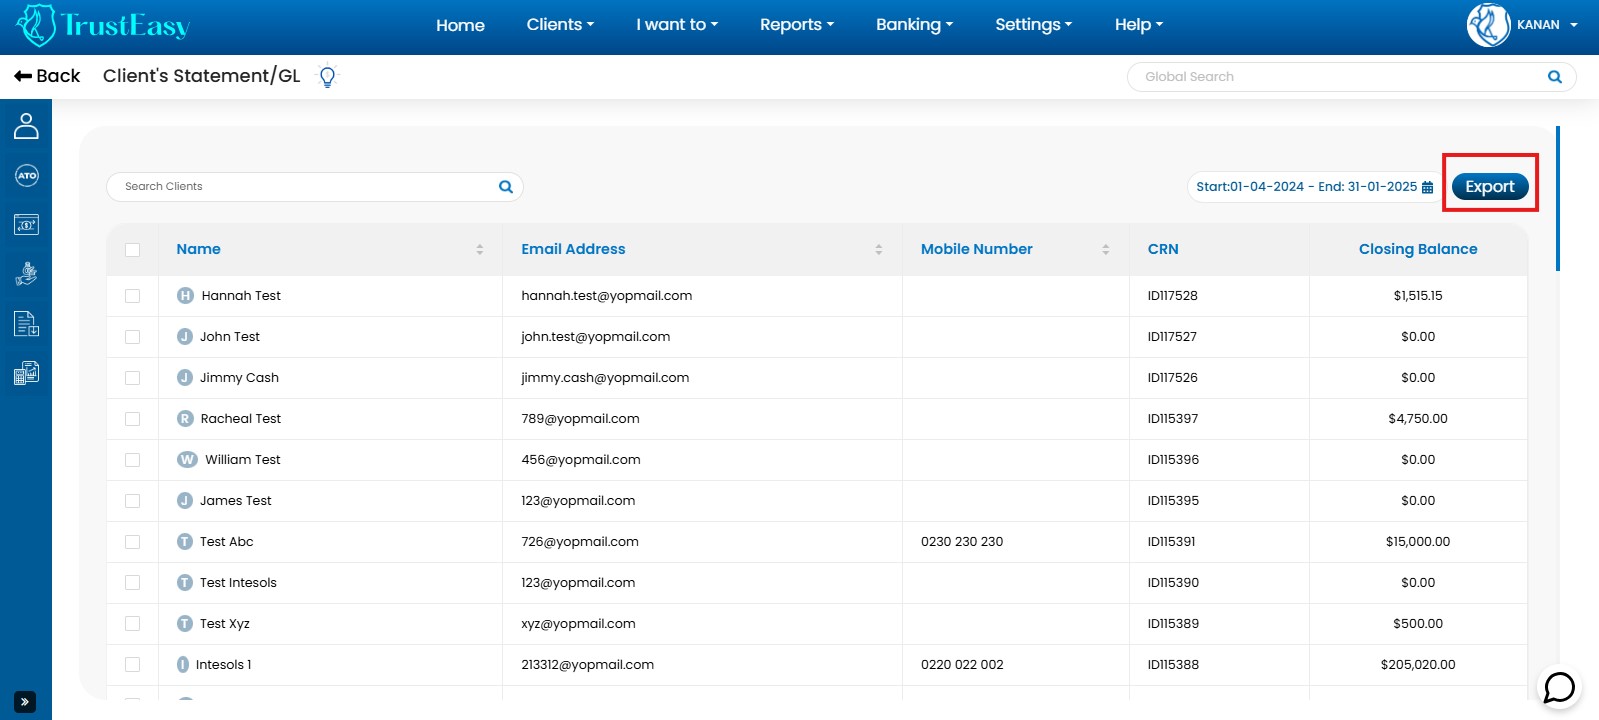
These steps allow you to efficiently produce both individual and multiple client statements within TrustEasy.
To view all client transactions and their reconciliation status in TrustEasy, follow these steps:
- Access the Reports section:Navigate to the “Reports” from the top menu.
- Select Client’s Transactions :Select the “Client’s Transactions” in the Reports menu.
- View Client Transactions:Once you are on the Client’s Transaction page, you will see a list of transactions from the trust account for all clients. This will include details such as transaction dates, amounts, and descriptions.
- Check reconciliation status:To determine whether a transaction is reconciled or not, look for the status indicators. If a transaction is reconciled with the bank statement, it will display a green tick mark. On the other hand, if the transaction is not reconciled, it will show a red cross symbol next to it.
![]()
By following these steps, you can easily view all client transactions in TrustEasy and identify their reconciliation status, helping you conduct a three-way verification of a trust transaction. This is crucial for Trust Account Audits.
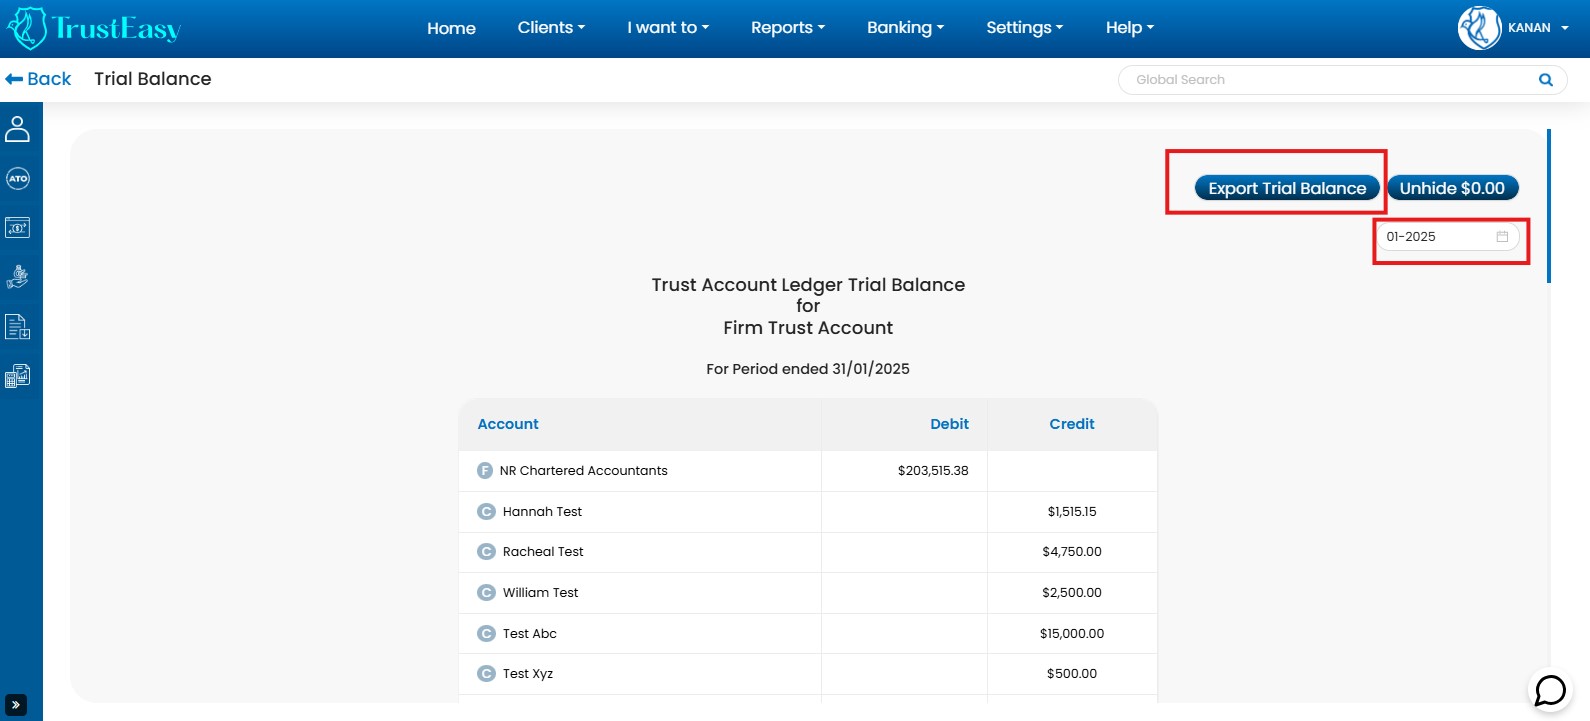
TrustEasy provides a “Trial Balance” feature to track client balances. To find the closing balance, follow these steps:
- Navigate to “Reports” from the top menu.
- Select the “Trial Balance” option.
- This will display the closing balance for all your clients.
- You can download a summary by clicking the “Export” option.
- You can also select a specific time frame for the report.
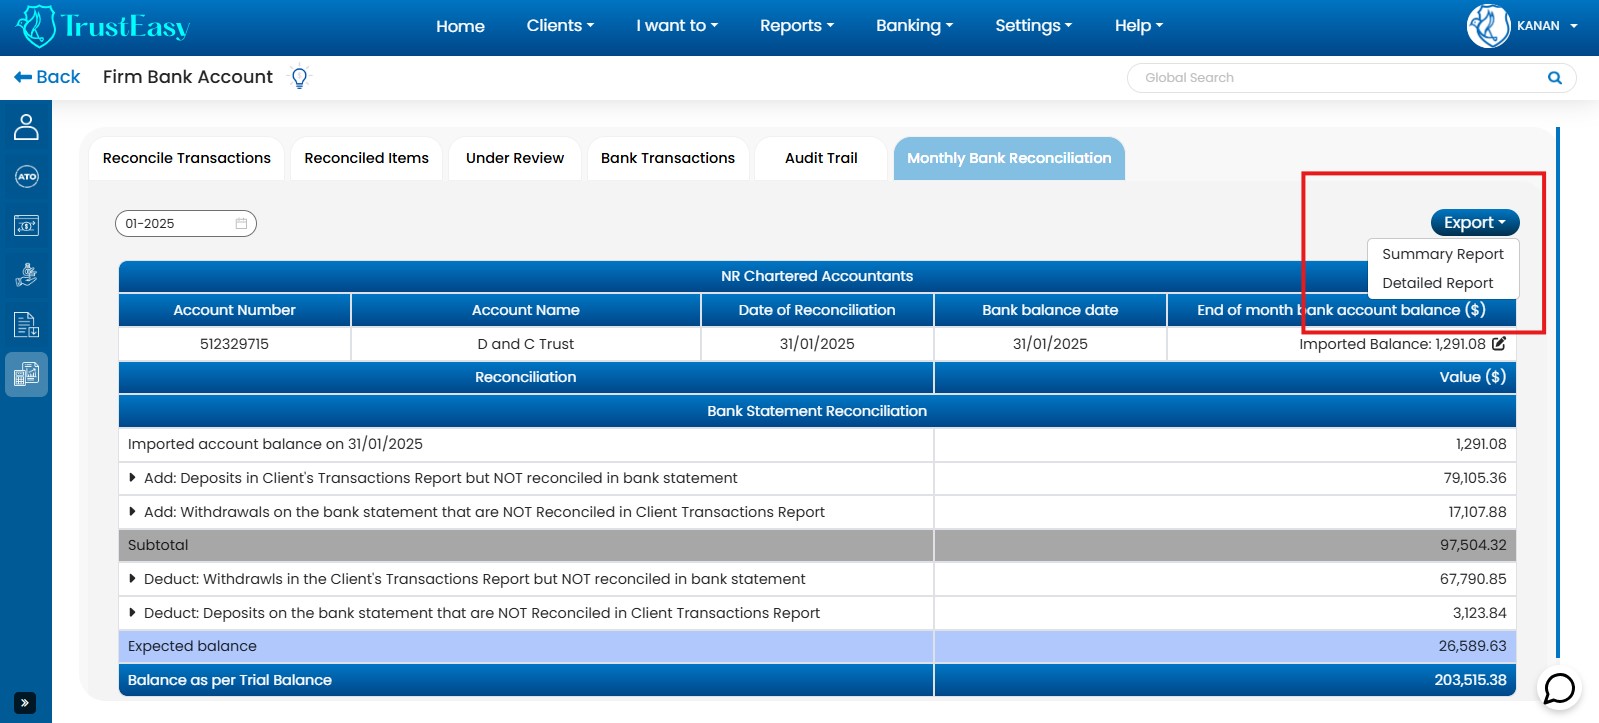
Yes, TrustEasy offers a monthly bank reconciliation report. To access and download it, follow these steps:
- Navigate to “Report.”
- Select the “Monthly Bank Reconciliation” report.
- If your Trust Account is correctly integrated and you regularly perform integrations, you should be able to generate an accurate report.
- Click the “Export” option to download the report. You can choose between a “Summary” or “Detailed” report format.
Once the bank account has been integrated into the TrustEasy then for reconcile bank statements and follow the steps:
- Access Firm Bank Account: Navigate to the “Firm Bank Account” section.
- Go to Reconcile Transactions: Click on the “Reconcile Transactions” tab.
- View Bank Transactions: Review the list of bank transactions on the left side.
- Allocate Transactions:
- Allocate each transaction to the appropriate Chart of Account, and client name, and add a description as needed.
- TrustEasy utilize AI and smart algorithms to assist in splitting and automatically allocating transactions.
- Search for Specific Items:
- Click on the three-dot menu next to a transaction and select the search option to locate specific items.
- If a transaction cannot be found, manually enter a trust receipt or payment from the search results area.
- Send for Review: Use the three-dot menu to send transactions requiring further review for proper handling.
By following these steps, you can effectively reconcile bank statements within TrustEasy, ensuring accurate categorization, allocation and review of all transactions.
To delete a wrong bank entry in TrustEasy, follow these steps:
- Navigate to “Firm Bank Account” and select the “Reconcile Transactions” tab.
- Locate and identify the incorrect bank transaction.
- Click on the three-dot menu next to the transaction.
- Select “Delete” from the options.
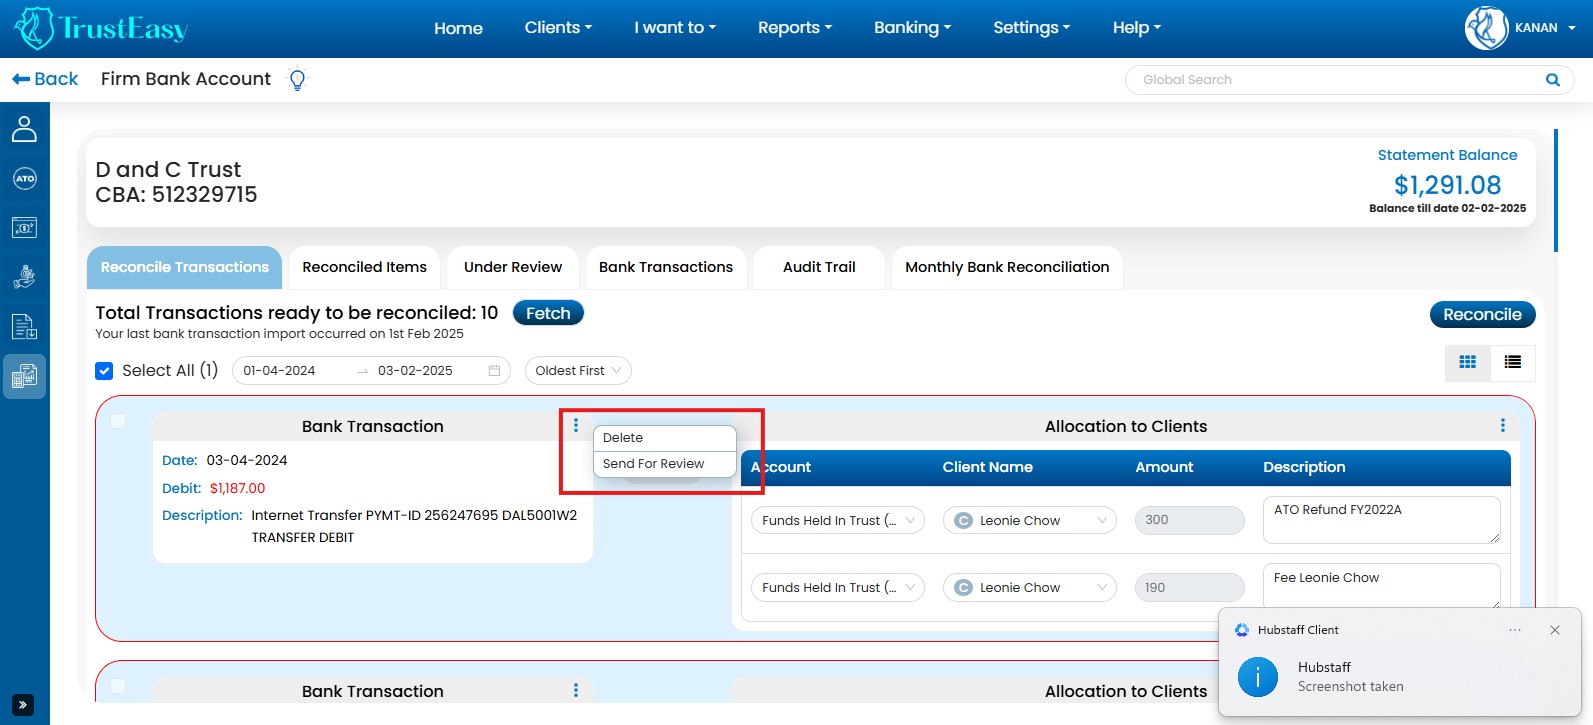
- Review the deleted transactions in the “Deleted Transactions” are of the Audit Trail.
Important Note:While these steps generally outline the process, the exact steps might vary slightly depending on your specific TrustEasy version. Always exercise caution when deleting financial entries, as they cannot be easily recovered.
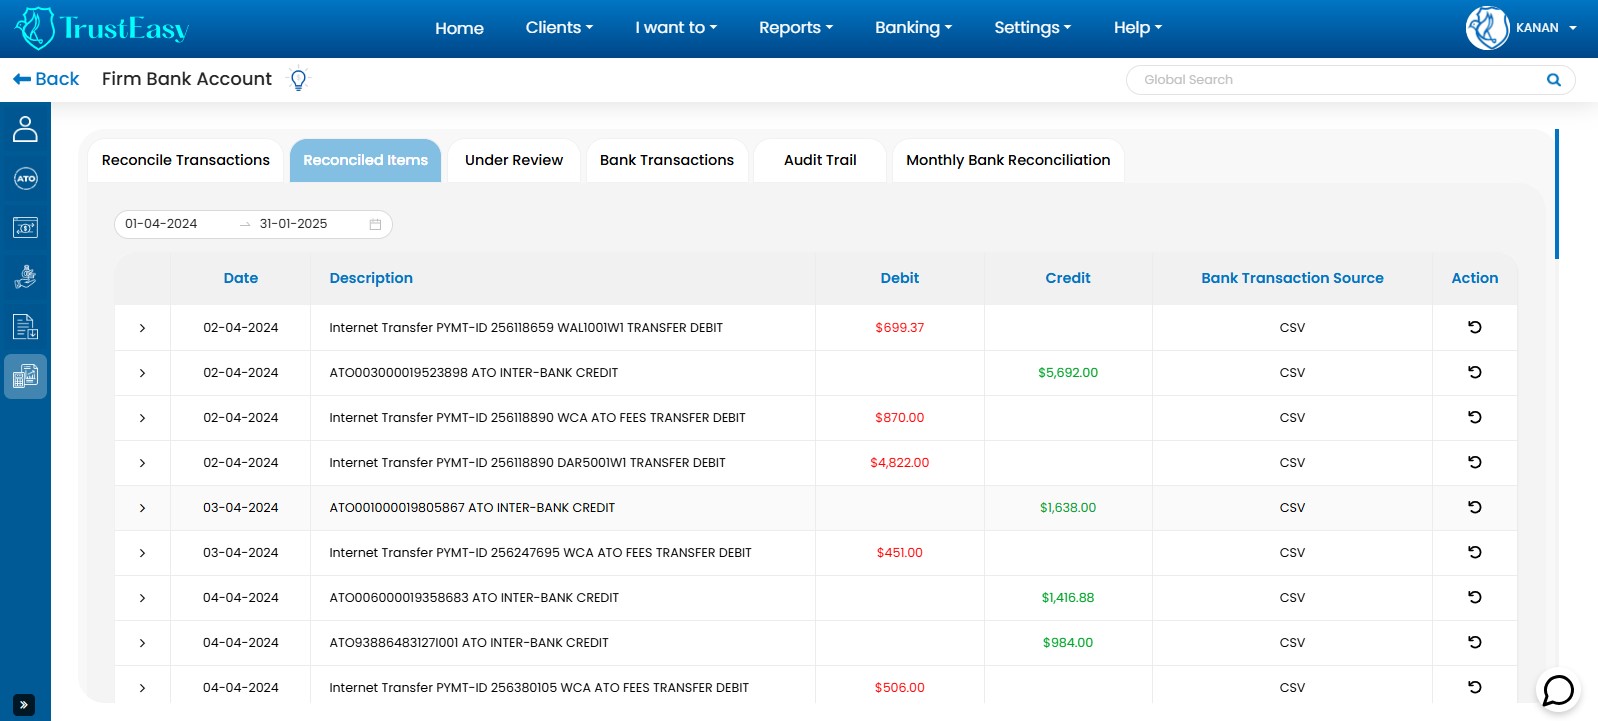
To view all reconciled bank transactions, follow these steps:
- Navigate to the Firm Bank Account.
- Entries that are not properly reconciled will appear in the “Reconciled Transaction” tab. You will need to manually reconcile these entries.
- Once a transaction (like a refund entry) is reconciled, it will move to the “Reconciled Items” tab, which is the second tab under the “Firm Bank Account” page. This tab displays all your reconciled transactions.
To review the doubtful bank entries in TrustEasy, follow these steps:
- Navigate to “Firm Bank Account” and select the “Reconcile Transactions”tab.
- Locate and identify the doubtful bank transaction.
- Click on the three-dot menu next to the transaction.
- Select “Send for the Review” from the options.
- The transaction will be moved to the “Under Review” section for further review.
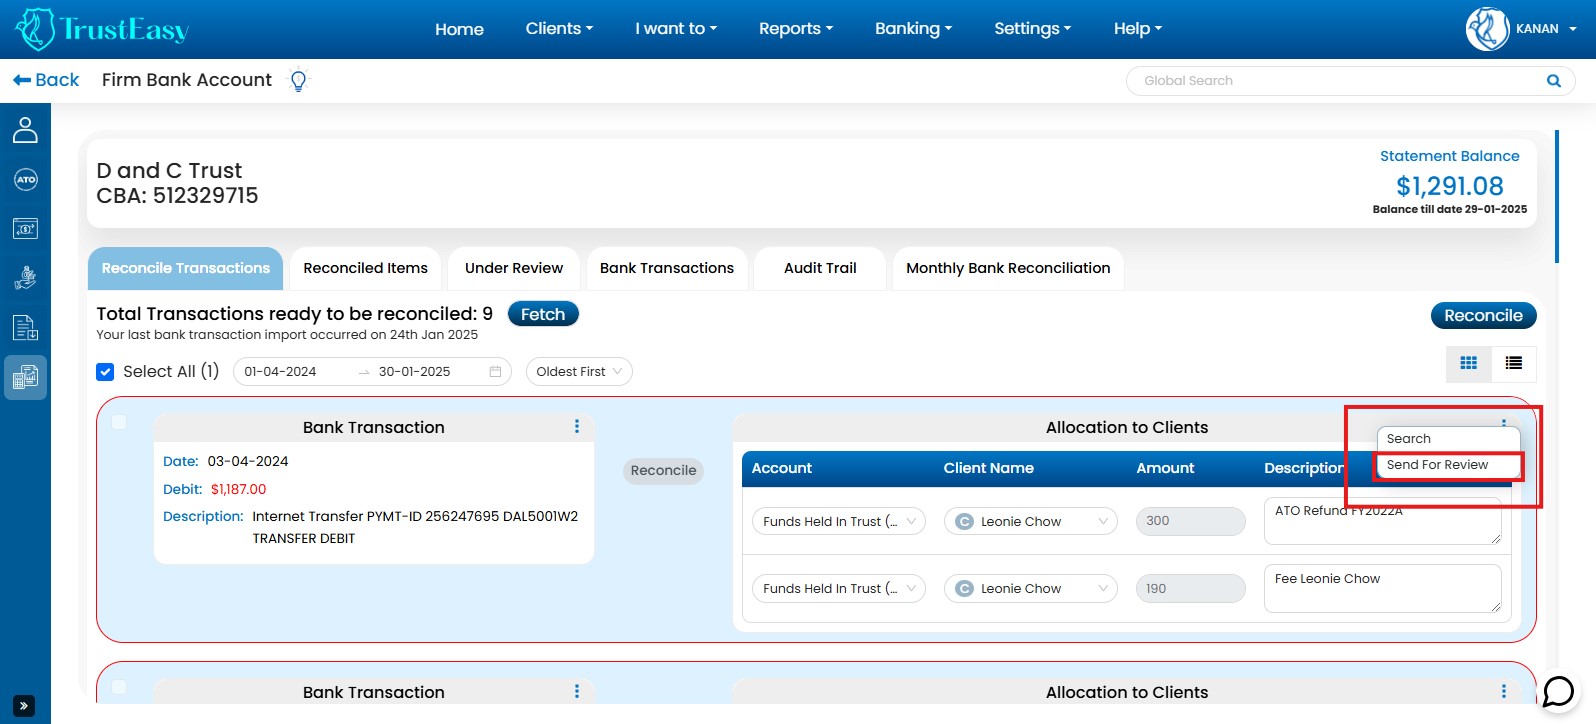
By using this feature, you can easily flag potentially problematic bank entries for review by other authorized users within TrustEasy, ensuring accurate and reliable financial records.
Note:The exact steps and terminology may vary slightly depending on your specific TrustEasy version.
To send an inaccurate refund entry for review in TrustEasy, follow these steps:
- Locate the entry:Navigate to the dashboard where you can view all clients and their refund stages. Identify the specific client or task containing the inaccurate refund entry.
- Access the review option:On the label representing the task, you will find an area typically labeled “Assigned to N/A”. Click on the three-dot menu within this area.

- Initiate the review process:From the menu options, select the option “Send for Review”.
- Provide context(optional):A dialog box will appear, allowing you to enter a comment or description regarding the inaccuracy. Provide any relevant details that will assist the reviewer in understanding and addressing the issue.
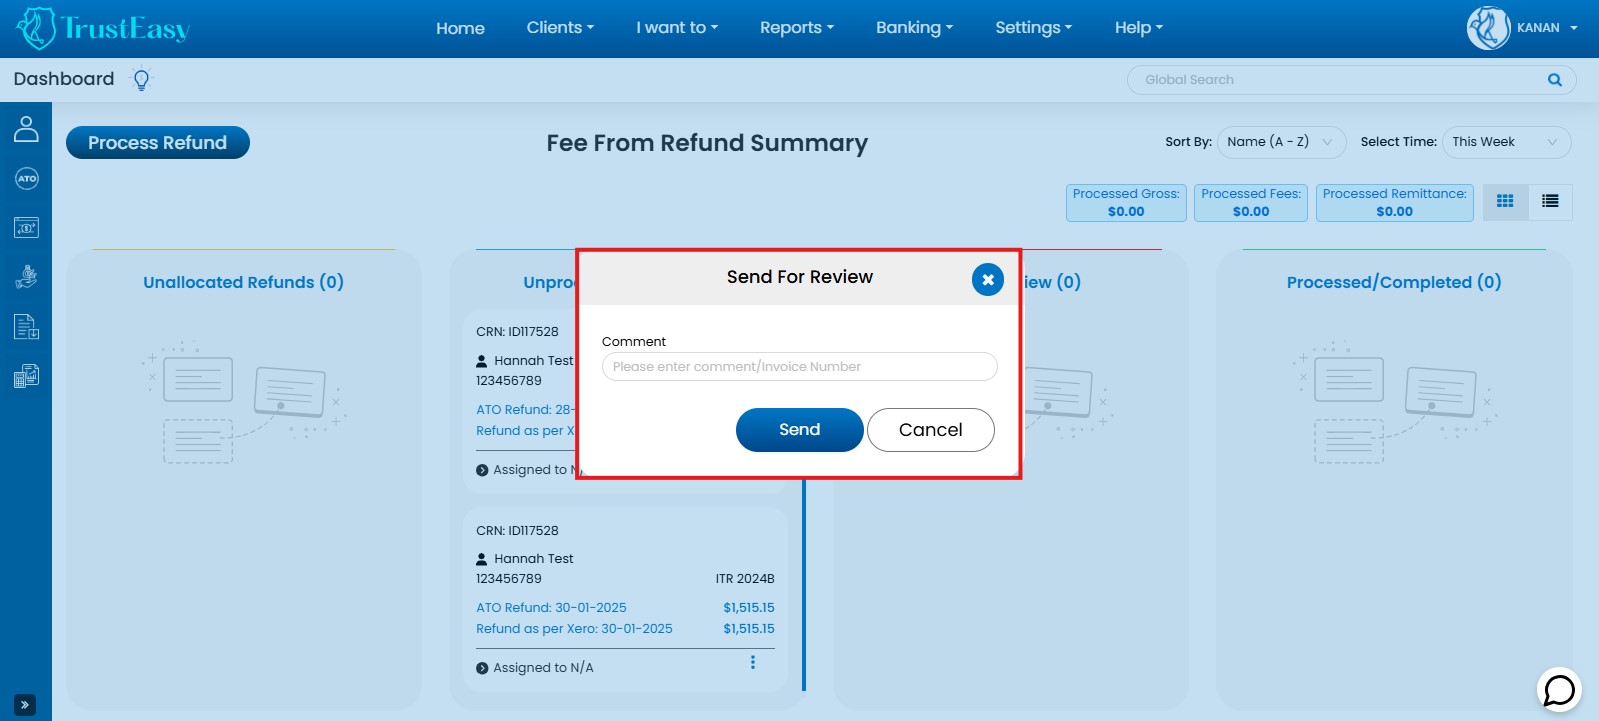
- Submit for review:Click on the “Send for Review” or similar button to submit the entry for review.
The inaccurate refund entry will then be flagged for review and assigned to the designated team member or reviewer for evaluation and correction. This process helps ensure the accuracy and integrity of your refund processing workflow by allowing for the timely identification and resolution of any errors or discrepancies.
- Access General Settings: Locate and navigate to the “General Settings” area within TrustEasy.
- Integrations: Go to the “Integrations” section within General Settings.
- Connect Bank Feeds: Click the “Connect” button within the “Automatic Bank Feeds” area.
- Bank Selection : Choose your bank from the provided list.
- Enter Credentials: Follow the prompts and enter your Internet banking credentials to establish a secure connection.
- Select Trust Account: Select the specific trust bank account associated with your firm.
Important:Unselect any unnecessary accounts to avoid confusion.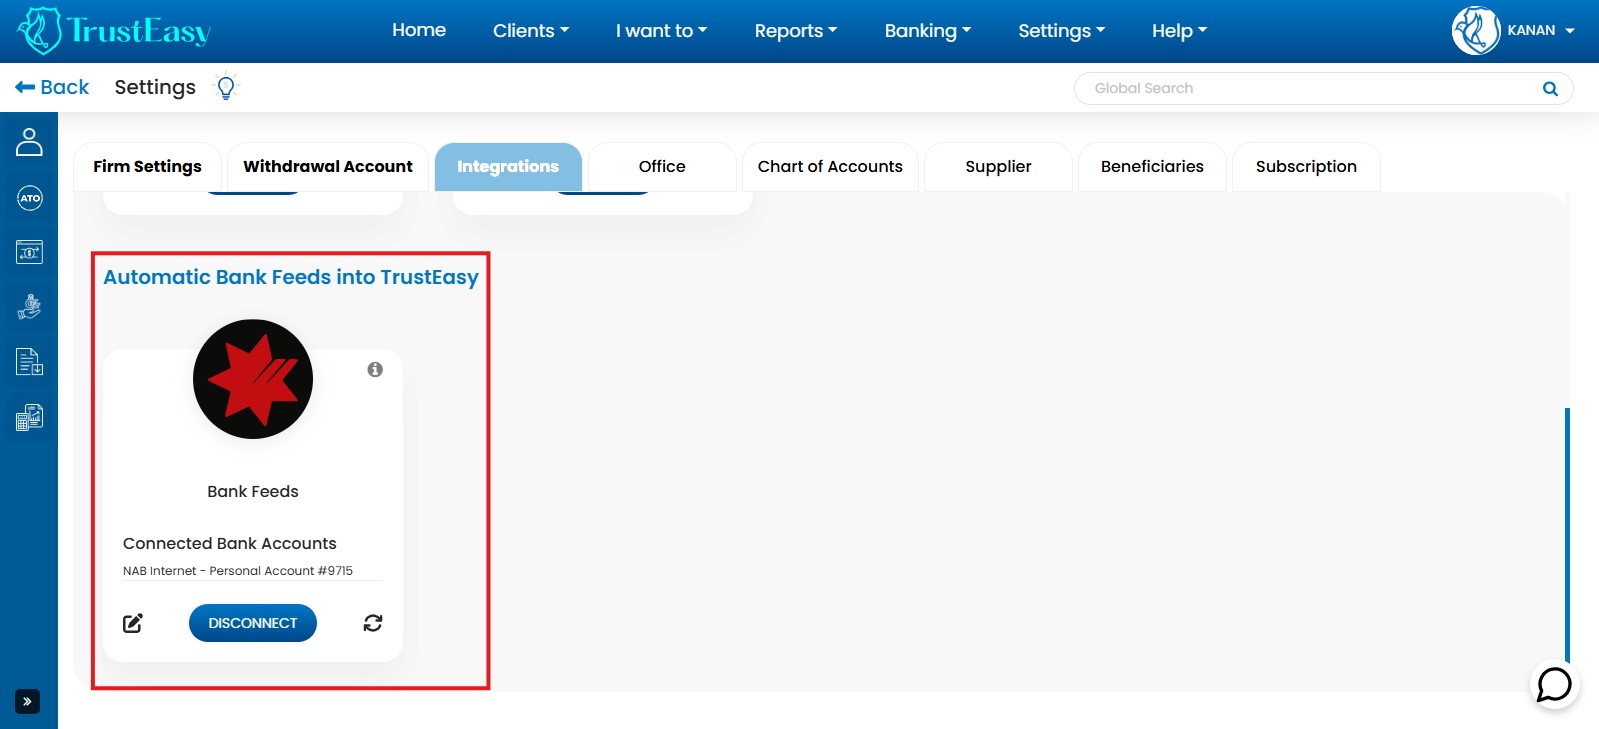
- Verify Connection: Confirm the successful connection status in the integration settings.
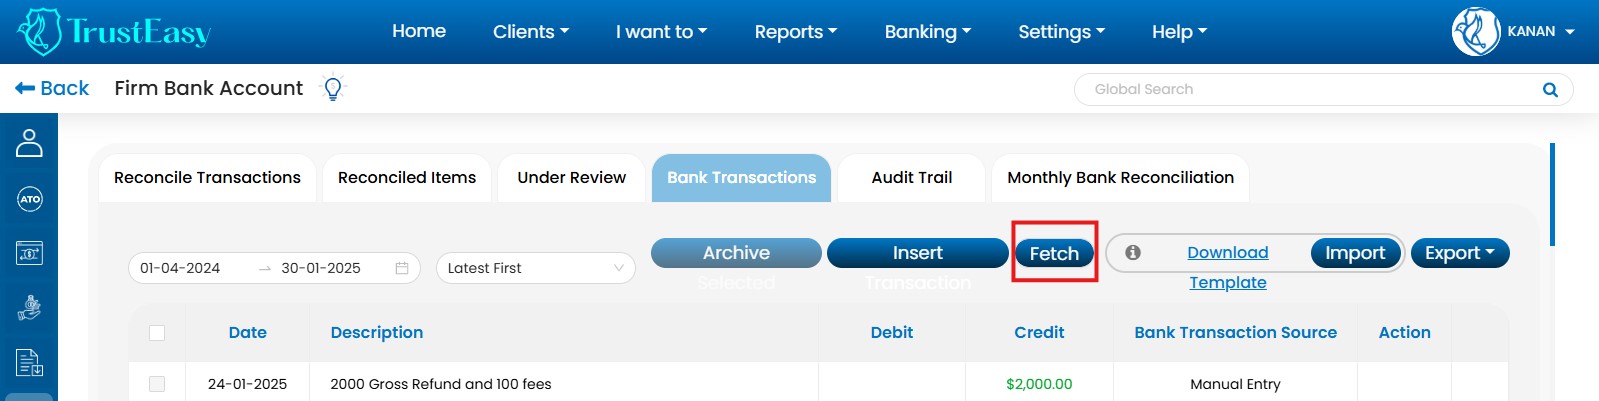
- Import Transactions: Go to “Firm Bank Account” -> “Bank Transactions” and click “Fetch” to import transactions automatically.
By following these steps, you can successfully set up automatic bank feeds for your trust bank account in TrustEasy, enabling seamless data synchronization between TrustEasy and your bank.
- Access Firm Bank Account:Navigate to the “Firm Bank Account” section.
- Go to Bank Transactions:Click on the “Bank Transactions” tab.
- Initiate Import:Click the “Import” button.
- Upload .csv File:Select and upload the .csv file containing your bank transactions. Ensure the file adheres to TrustEasy’s formatting requirements.
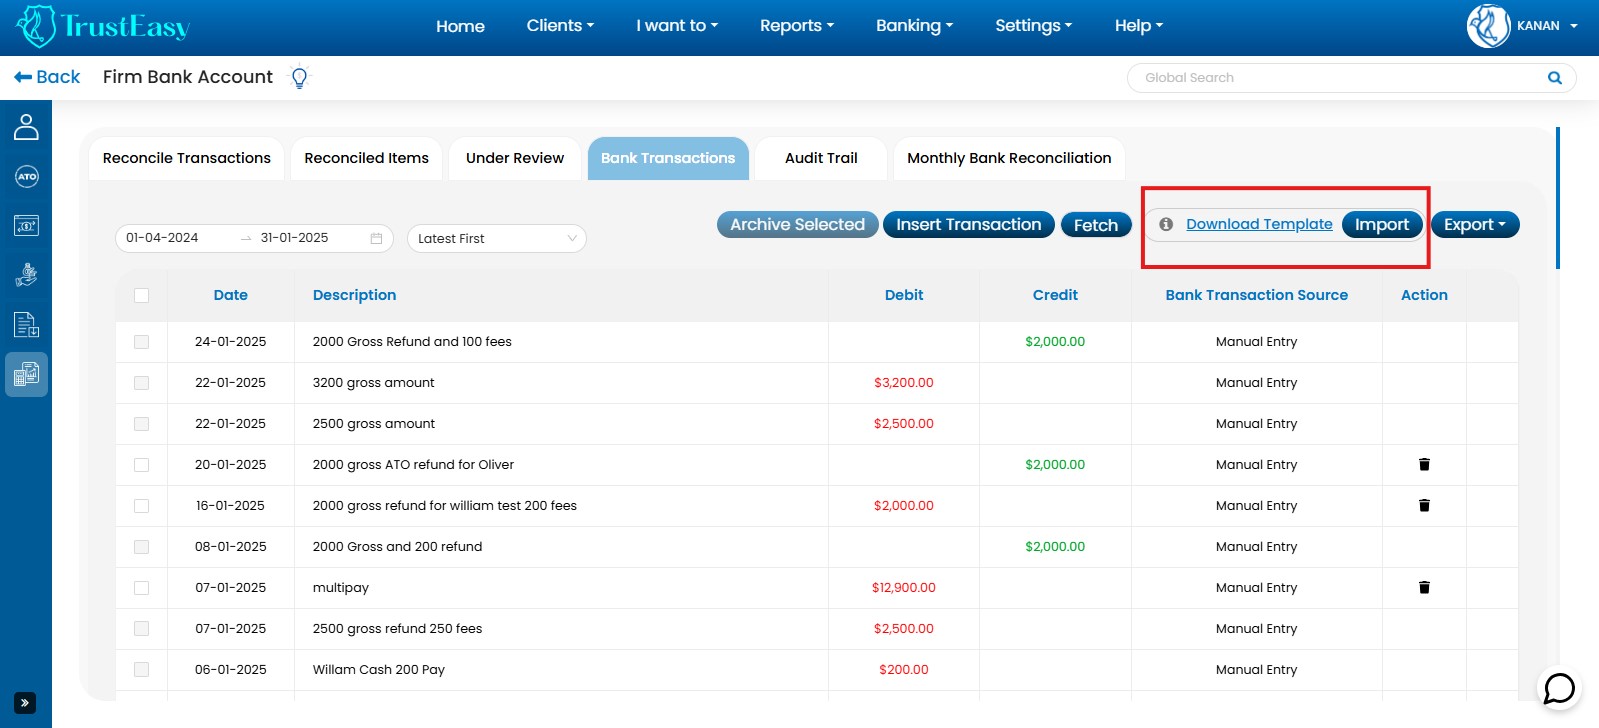
- Duplicate Transaction Prevention:TrustEasy employs algorithms to prevent duplicate imports.
- Review Imported Transactions:Carefully review the imported transactions for accuracy.
- Delete Mistaken Transactions:Delete any incorrect or unwanted transactions.
- Audit Trail:TrustEasy maintains an audit trail of all imported and deleted transactions, including date, time, and user.
By following these steps, you can effectively import bank statements via .csv into TrustEasy, ensuring data accuracy and maintaining a clear audit trail of all transactions.
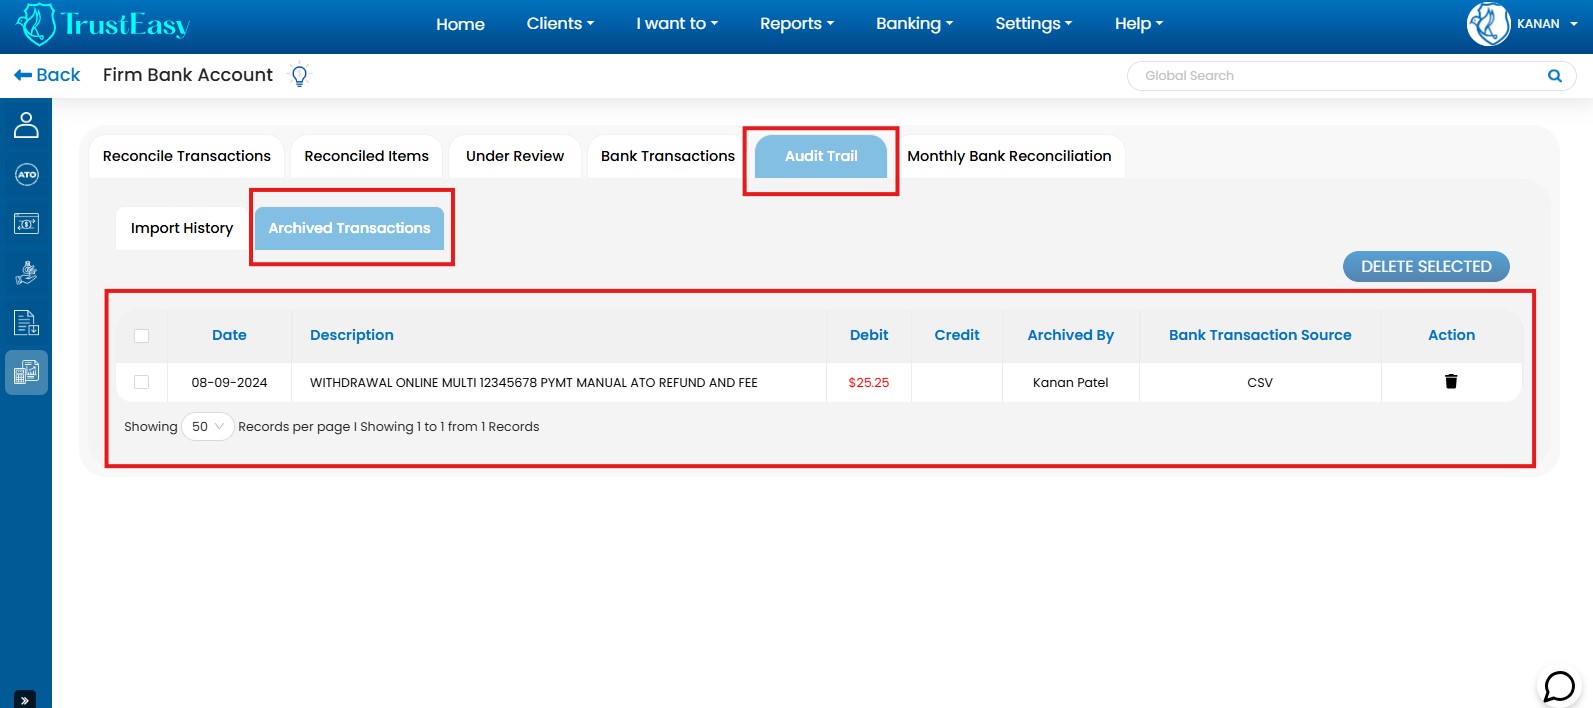
Yes, TrustEasy maintains an “Audit Trail” tab within the “Firm Bank Account” section. This tab provides a detailed history of bank entries, including :
- Import Times:When each bank transaction was initially imported into the system.
- Deletion Records:Information about any deleted transactions, including the date and time of deletion.
The “Audit Trail” tab allows you to review the history of your bank transactions, ensuring transparency and accountability for all changes made to bank entries within TrustEasy.
TrustEasy is a cloud-based software. You can access it from any browser with an internet connection and an active subscription.
- Amigo
- AMP
- ANZ
- ANZ Plus
- Arab Bank Australia
- Aussie home loan
- Australian Miliary Bank
- Australian Mutual Bank
- Australian Unity Bank
- Auswide
- Bank Australia
- Bank First
- Bank of China
- Bank of Melbourne
- Bank of Queensland
- Bank of Sydney
- Bank of Us
- BankSA
- BankVic
- Bankwest
- BCU
- Bell Potter
- Bendigo Bank
- Beyond Bank
- BHCCU
- BOQ Specialist
- Cairns Bank
- CardServices
- Central Murray CU
- Central West CU
- Challenger
- Citi
- Coastline CU
- Coles Financial Services
- CommBiz
- Commonwealth
- Commonwealth Business
- Community FCU
- Credit Union SA
- DDH Graham
- Defence Bank
- Dnister
- Easy Street
- Family First
- Fire Services CU
- Firefighters Mutual Bank
- First Choice CU
- First Option Bank
- G&C Mutual Bank
- Gateway Bank
- Geelong Bank
- Goulburn Murray CU
- Great Southern Bank
- Health Professionals Bank
- Heritage
- Hiver Bank
- Horizon Bank
- HSBC
- HSBC Bank Wholesale Banking
- Hume Bank
- Illawarra Credit Union
- IMB
- ING
- Judo Bank
- Kogan Money Credit Cards
- Laboratories CU
- Macquarie Bank
- Maitland Mutual Limited
- Me Bank
- Move Bank
- Myer
- MyState Bank
- NAB
- Newcastle Permanent
- Orange Credit Union
- Paypal Australia
- People’s choice
- PN Bank
- Police CU
- Qantas Premier Credit Cards
- QBank
- Qudos Bank
- Queensland Country
- Rabo Bank Farm Business
- Rabo Bank Online Savings
- RACQ Bank
- RAMS
- Regional Australia Bank
- Reliance Bank
- RSL Money
- Southern Cross CU
- St.George Bank
- Summerland CU
- Suncorp
- SWSCU
- Teachers Mutual Bank
- The Capricornian
- The MAC
- Thriday
- Transport Mutual CU
- Tyro Payments
- Ubank
- UniBank
- Unity Bank
- Unloan
- Up Bank
- Virgin Money
- Warwick CU
- WAW
- Westpac
- Westpac Business
- Woolworths
- Woolworths Team Bank
The process is as follow:
Client Trust Accounts:Go to Settings > Enter Opening Balance. Click “Add”, enter the Client’s name and balance and save.
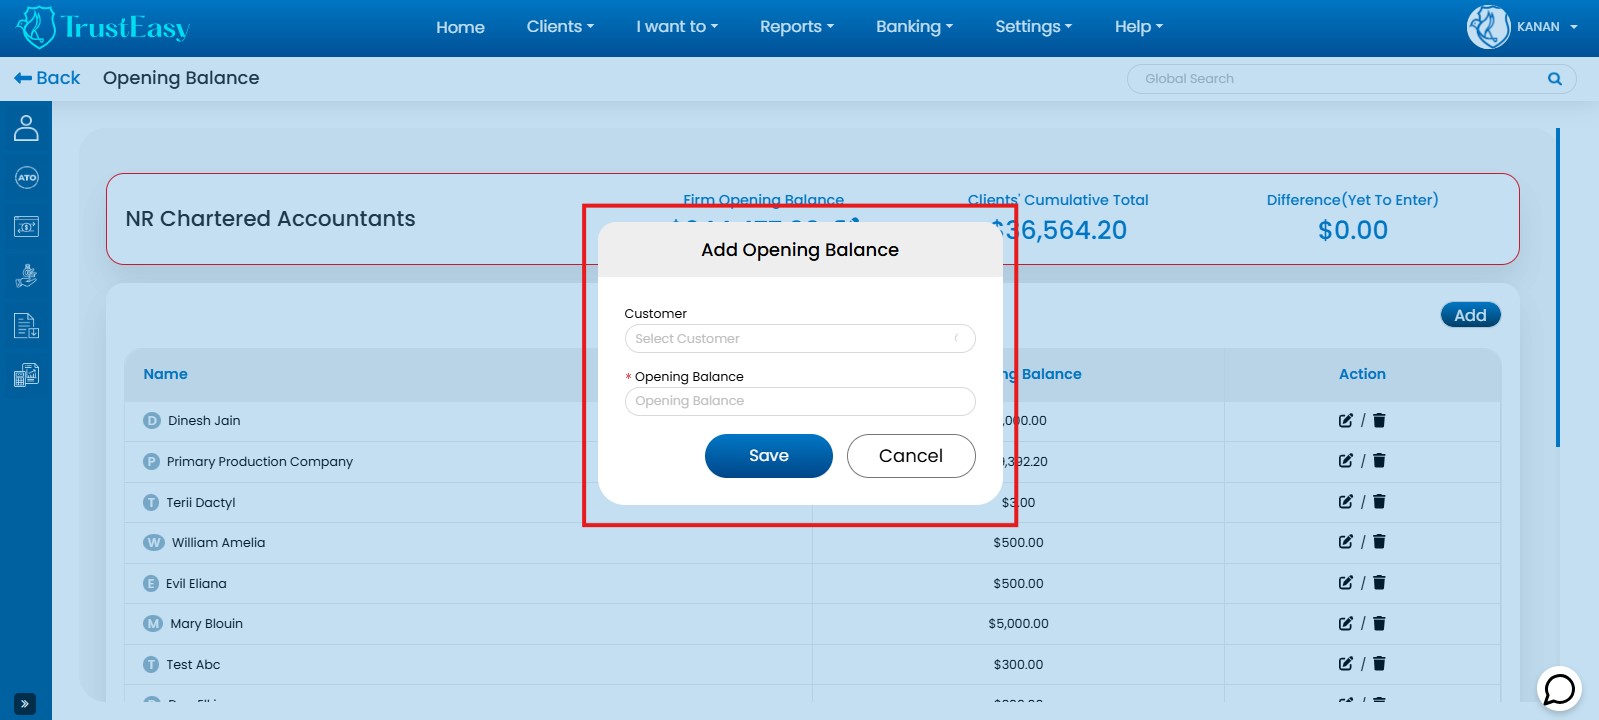
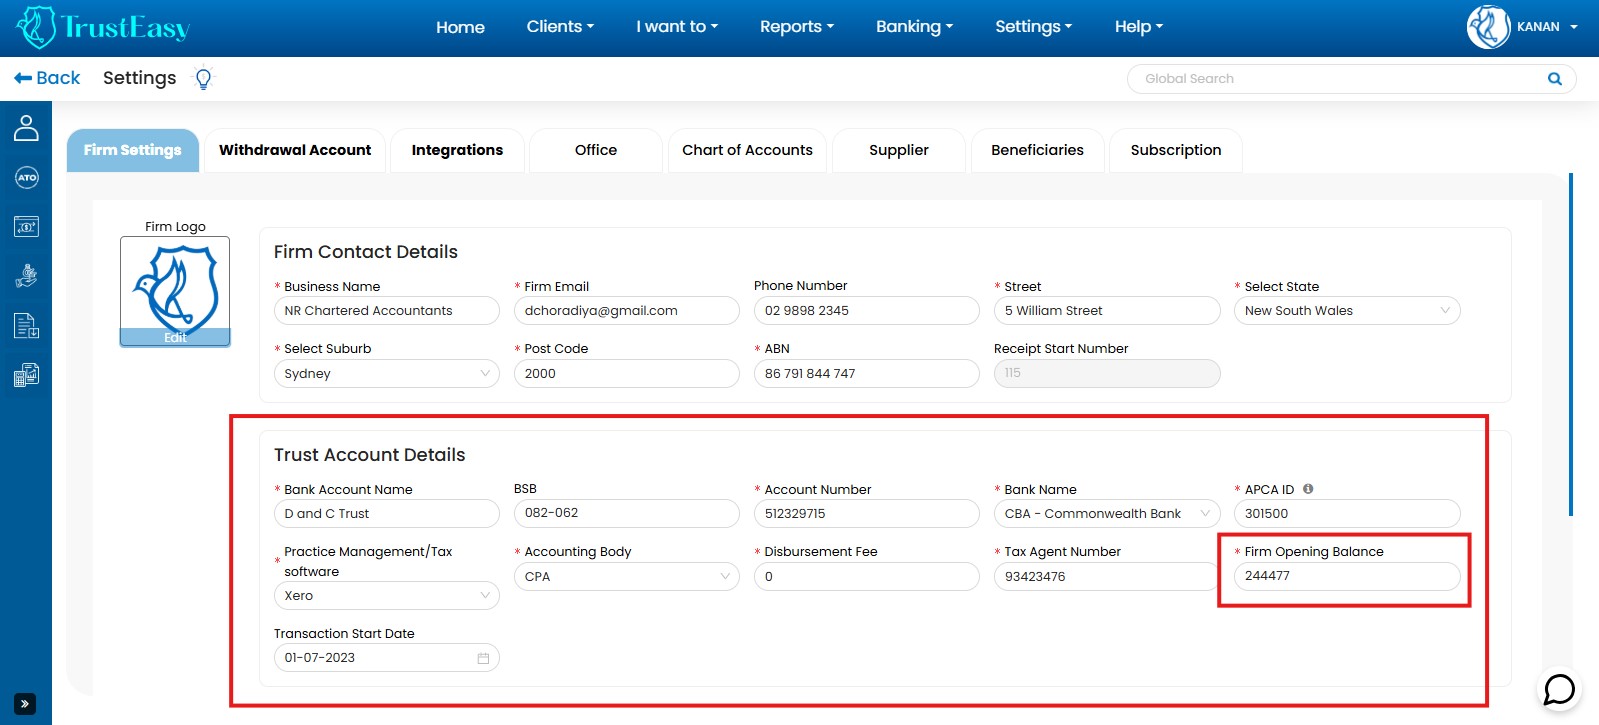
Firm Trust Account:Go to Settings > General Settings > Firm Settings. Locate the “Trust Account Details” section and enter the balance in the “Firm Opening Balance” field. Save your changes.
An Application Programming Interface(API) is a set of rules and protocols that allows different software applications to communicate and interact with each other. If defines the methods and data formats that can be used to request and exchange information between applications.
TrustEasy leverages APIs to enable seamless integration with other cloud-based applications. This allows for smooth data exchange and enhanced functionality.
To connect to an external cloud-based app via TrustEasy’s APIs:
- Identify the target app:Ensure the app provides open APIs for Integration.
- Contact TrustEasy Support:Express your interest in connecting with the specific app.
- Provide integration details:Share your requirements with the support team.
- Feasibility assessment:TrustEasy will evaluate the integration’s feasibility.
- Implementation:TrustEasy’s development team will work on connecting the applications.
- Start using the integration:Begin exchanging data and utilizing the connected app’s features within TrustEasy.
NOTE:Integration availability may vary. Consult TrustEasy Support for specific requirements and possibilities.
- Log in to TrustEasy:Enter your credentials and access your account.
- Access User Profile:Locate your user profile from the top right corner (usually an icon with your username). Click on My Profile.
- Manage MFA Settings:Find the Two-Factor Authentication within the user profile. By default, MFA is recommended for enhanced security.
- Enable/Disable MFA:To disable MFA, follow the on-screen instructions.
Note:Disabling MFA may compromise account security.
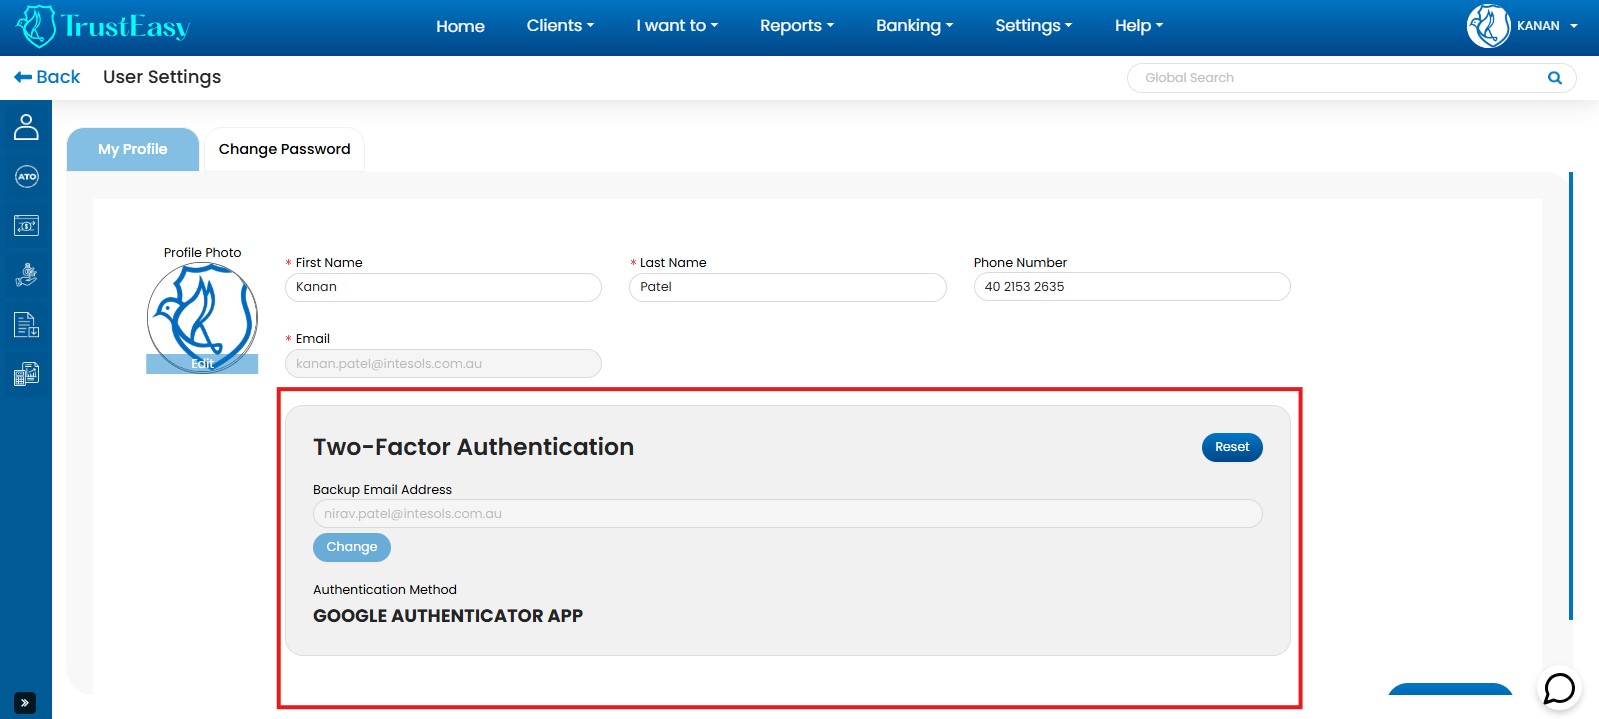
Important Note:MFA adds an extra security layer by requiring an additional verification step (e.g. code from an authentication app or SMS) beyond your password.
By following these steps, you can effectively manage MFA/2FA settings within TrustEasy to enhance your account security.
TrustEasy’s Global Search function, accessible from any page within the portal , allows you to quickly find specific information across various areas of the software.
When you enter a search query, the system will display relevant results, which may include:
- Client Records:Find client information based on names, addresses, tax file numbers, etc.
- Refund Details:Locate information about specific refunds, including amounts, dates and processing status.
- Other Relevant Information:Depending on your search terms, the results may also include other relevant information within the TrustEasy System.
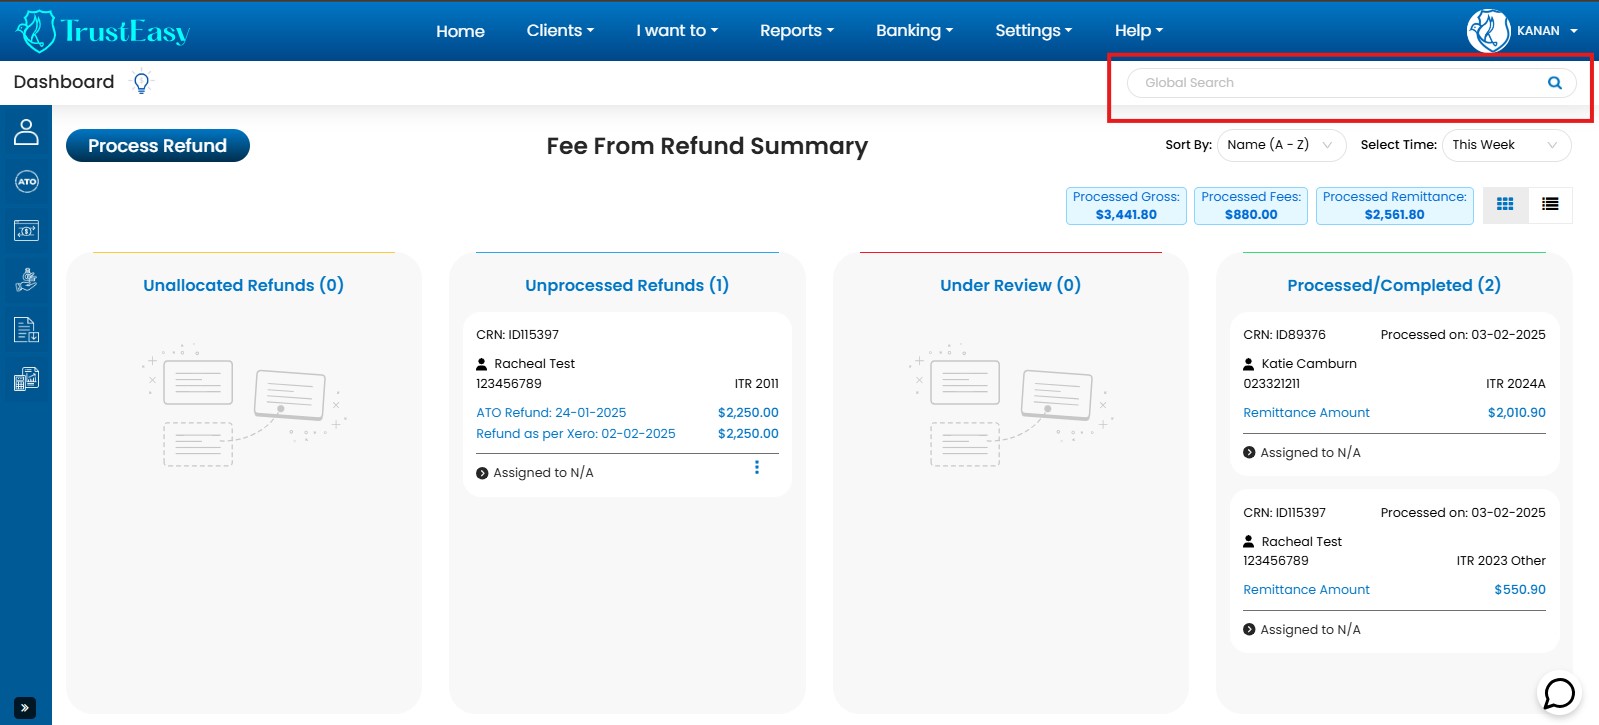
This powerful feature significantly enhances navigation and helps you efficiently locate the information you need within the TrustEasy portal.
Aside from retrieving client data directly from your CRM, there are other ways to input client information into the system. One such method is encountered during the process refund procedure. If a client is not properly registered, you can navigate to the process refund page and click on the “New” tab to add the client manually within the TrustEasy system.
TrustEasy provides a simple solution to address discrepancies between the ATO refund and the expected refund amount calculated by your tax software.
- TrustEasy Auto-Populates:TrustEasy automatically populates the tax software box with the refund amount received from the ATO.
- Edit Refund Amount:
- Locate the three-dot menu icon within the tax software box displaying the pre-filled refund amount.
- Click on the three-dot menu icon and select “Edit”.
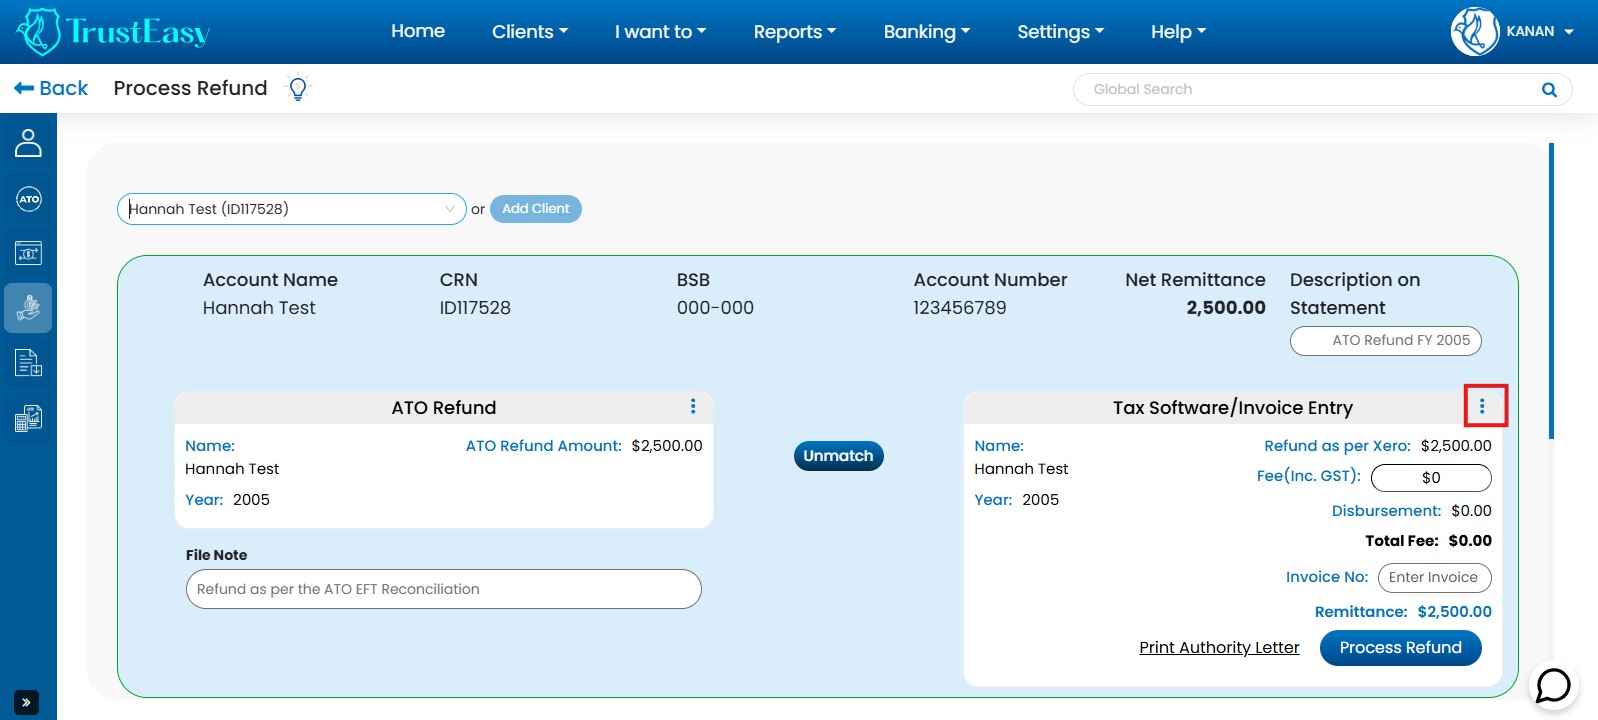
- Update Refund Value:Modify the existing refund amount with the correct value based on the expected refund amount calculated by your tax software.
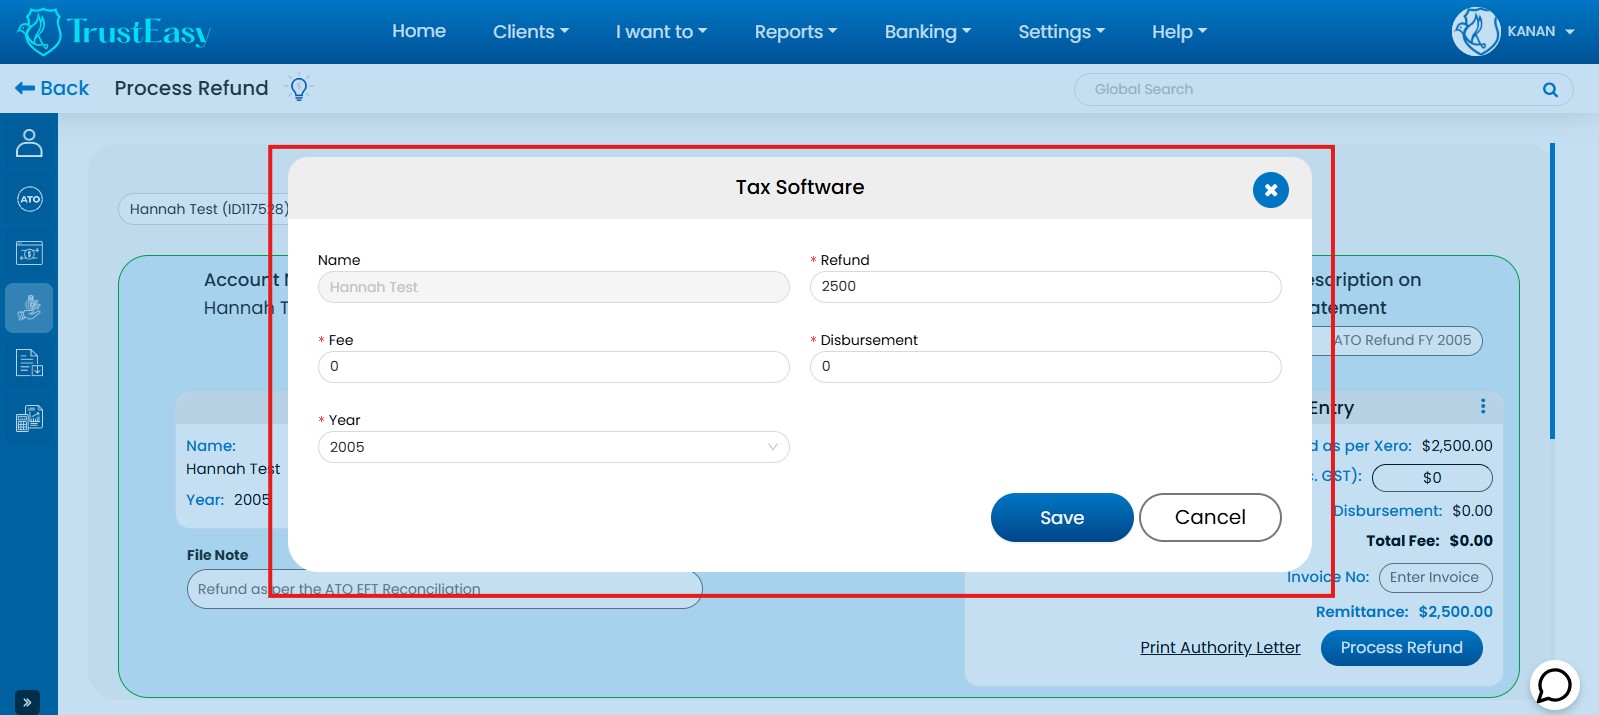
By following these steps, you can easily adjust the refund amount within TrustEasy to ensure accuracy and resolve any discrepancies between the ATO refund and the expected refund.
You can only correct mistakes in the .aba file before it is finalized.
- Locate the .ABA Section:Find the .ABA section within TrustEasy. This section contains the raw .aba files created during refund processing.
- Identify the Error:Locate the specific .aba file or line item containing the mistake.
- Click “Undo”:Click the “Undo” button next to the erroneous entry.
- Return to Reconciliation:This action will return the refund entry to the reconciliation page.
- Correct the Error:Make the necessary corrections to the refund entry on the reconciliation page.
Important Note:Once the .aba file is finalized and moved to the history, you cannot make any changes.
In order to find the reports for the auditors you will need to follow these steps:
- Access Reports Section:
- Log in to your TrustEasy account.
- Click on the “Reports” option in the top menu bar.
- Select Audit Reports:
- Choose the specific report required by your auditors from the available options.
- Examples include “Client Statements,””Transaction History,”etc.
- Customize Reports:
- Specific criteria such as date range, clients, and other relevant filters.
- Generate Reports:
- Click on the “Export” or “Generate” button.
- Select the desired format (e.g., PDF, Excel)
- Generate Multiple Client Statements:
- Select multiple clients and export their statements in PDF format for easy review.
- Select multiple clients and export their statements in PDF format for easy review.
By following these steps, you can easily locate and generate the necessary reports for your auditors within the TrustEasy system.
To check when a client record was last synced with Access Account Cloud(Salesforce) or Xero Practice Manager (XPM), follow these steps:
- Navigate to the client record:Locate the specific client record within the system.
- Check sync history:Scroll down to the bottom of the client record page. You should find a timestamp indication the date and time to the last successful sync with the respective platform (Salesforce or XPM).
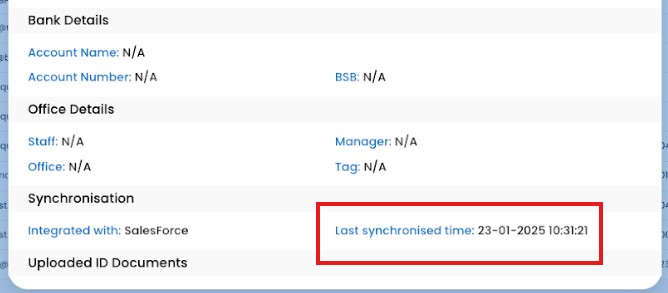
This timestamp provides a clear record of the last synchronization event for that particular client.
TrustEasy provides several mechanisms to alert you of potential errors or issues:
- Error Pop-ups:When an error occurs, a prominent red pop-up notification will appear in the top right corner of the screen, clearly indicating the specific error encountered.
- Validation Messages:Throughout the application, TrustEasy incorporates validation checks. If you enter incorrect or incomplete information, you will see validation messages displayed near the relevant fields or sections, guiding you on how to correct the input.
- Audit Trail:TrustEasy maintains a record of all actions and transactions within the system’s audit trail. This can be helpful in investigating and identifying the source of an error if it occurs during a particular task.
If you encounter any errors or are uncertain about the accuracy of your actions, it’s recommended to contact the TrustEasy support team via email or consult this Q&A section for assistance.
While TrustEasy allows for entering trust payments, it’s crucial to understand the implications of prepaying a refund amount before receiving it from the ATO.
Here’s the general process for entering trust payments:
- Navigate to “I want to”:In the top navigation panel, locate and click on the “I want to” tab.
- Select “Enter Trust Payments”:Choose the “Enter Trust Payments” option from the “I want to” menu.
- Enter payment details:Fill in the required information, including the client’s details and the amount you wish to prepay as a refund.
- Save the entry:Save the prepayment entry in the system.
Important Considetations:
- Prepayment Risks:Prepaying a refund before receiving it from the ATO carries inherent risks. The actual refund amount from the ATO may differ from your estimated prepayment. Additionally, there might be outstanding amounts owed to government agencies that could impact the final refund amount.
- Recommended:It is generally recommended to wait for the ATO to process and issue the refund before making any prepayments. This ensures accuracy and minimizes potential discrepancies.
Disclaimer:This information is for general guidance only and should not be considered financial or legal advice. Consult with a qualified professional or relevant authorities for specific advice tailored to your situation.
Note:These steps provide a general overview. The specific steps and options within TrustEasy may vary depending on the version and your specific user permissions.
There are two approaches to resolving import issues with .csv files in TrustEasy.
- Contact TrustEasy Support:
- This is the recommended course of action for any import problems.
- Email the TrustEasy support team at support@trusteasy.com.au
- Clearly explain the issue you’re facing, specifying whether it’s related to client import or the ATO EFT reconciliation report.
- Attach the .csv files you’re trying to import, along with any error messages encountered.
- The support team will investigate the issue, potentially request further details, and work towards a solution.
- Once resolved, they may provide fixed .csv files for successful import.
- Important Note for Xero Practice Manager (XPM) Client Data:
- If you’re importing client data from XPM, be aware that TrustEasy can only see the last three digits of Tax File Number(TFNs) due to XPM masking.
- To address this, you will need to manually update each TFN within TrustEasy after import.
Additional Tips:
- Ensure the .csv files adhere to the TrustEasy import template format.
- Verify that the data within the files is properly formatted to match TrustEasy’s expectations.
By following these steps and considering the XPM data import caveat, you should be able to effectively troubleshoot and resolve import issues with .csv files in TrustEasy.
Xero Integration Guideline for TrustEasy
Welcome to the Xero Integration Guide for TrustEasy! This guide will walk you through the process of integrating a TrustEasy account with Xero Practice Manager, a leading accounting software platform. The integration process involves two key stages:
Single Sign-On (SSO) is a key component of the TrustEasy and Xero Practice Manager (XPM) integration. SSO simplifies the login process for users by allowing them to access TrustEasy using their Xero (XPM) credentials. Here’s how it works:
User Access
When a user attempts to access TrustEasy, they will be presented with an option to log in using their Xero Practice Manager (XPM) account.
Xero Authentication
Clicking on the Xero login option will redirect the user to Xero’s authentication page, where they can enter their Xero Practice Manager (XPM) credentials.
Authorization
After entering the credentials, the user will be asked to grant TrustEasy the necessary permissions, such as access to basic details and the client list.
Access Granted
Once the user grants permission, they will be redirected back to TrustEasy and logged in automatically, simplifying the login process and enhancing security.
Before we proceed, let’s clarify the requirements for each stage of the integration.
1. Login / Signup with Xero
This stage enables users to link the TrustEasy account with the Xero Practice Manager (XPM) account for a seamless and secure login experience.
To facilitate a secure and user-friendly login/signup experience with XPM, TrustEasy requires the following.
Basic Details
TrustEasy will request users to enter the login credentials, such as account name, email address and password. This information is essential for creating a seamless login experience.
2. Importing Clients
TrustEasy requires specific permissions from your Xero Practice Manager (XPM) account to import client information, which is essential for streamlining your operations.
To ensure the efficient import of client data from XPM into TrustEasy, the following permissions are required.
Client List Permission
TrustEasy needs permission to access the client list in Xero. This permission allows TrustEasy to retrieve and display the client information within the TrustEasy platform.
Let’s explore the integration with the below steps.
1. Open the Website URL
Visit your web application’s URL http://app.trusteasy.com.au

2. Locate the “Login with Xero” Button
On the website’s interface, you will find a “Login with Xero” button prominently displayed with Xero branding.
3. Initiate Single Sign-On (SSO)
Clicking the “Login with Xero” button triggers the Single Sign-On (SSO) process.
4. Xero Authentication
Users will be redirected to Xero’s authentication page, where they can securely enter XPM credentials.

5. Permission Authorization
After entering the login credentials, users will be prompted to grant permissions to TrustEasy. These permissions typically include access to basic client information assigned to the user. Users without admin rights will not be able to pull client’s information in TrustEasy.

6. Return to TrustEasy
Once permissions are granted, Xero will redirect the user back to the web application with one of the following outcomes:
i. Existing TrustEasy User
For existing TrustEasy users, the system will log them into the web application and take them onto the dashboard.
ii. Non-Existing TrustEasy User
If users are not registered with TrustEasy, the system will guide them to the signup page where they can create a new account.

In the TrustEasy web application, users have the flexibility to establish and disconnect Xero account as needed. These actions are performed from the Integration tab within the General Settings page of the application. Here’s how users can connect and disconnect your Xero account:
Connect/Disconnect Your Xero Account after login
Follow these steps to connect TrustEasy to Xero Practice Manager (XPM) account:
Log in to Your Web Application
Access TrustEasy using XPM login credentials.
Navigate to General Settings
Once logged in TrustEasy, from the top menu, locate and access the “General Setting” page:
")
Open the Integration Tab
Within the General Settings page, look for the “Integration” tab. Click on it to access the integration settings.
Connect to Xero
In the Integration tab, you will find an option to “Connect to Xero” or a similar button. Click on this button to initiate the connection process.

Xero Authentication
You will be redirected to Xero’s authentication page, where you can securely enter your Xero Practice Manager (XPM) credentials.
Grant Permissions
After entering the XPM login credentials, the user is prompted to grant permissions to TrustEasy. These permissions typically include access to Xero account’s data, such as client lists and other relevant information.

Connection Confirmed
Once users grant permission, the Xero Practice Manager (XPM) account will be successfully connected to TrustEasty. After this step, users can access Xero data and functionality as needed within TrustEasy.
The integration with Xero allows users to seamlessly import client lists into TrustEasy, making it easier to access client details quickly and efficiently with just a few clicks. This guide will walk you through the process of importing clients from your Xero account.
Importing Clients from Xero
To import clients from your Xero account, please follow these steps:
Log In
Start by logging into your account on our platform.
Navigate to “Clients”
Once you’re logged in, you’ll find a “Clients” option in the top navigation bar. Click on it to access the client section.
Initiate Import
Inside the “Clients” section, look for the “Import” button. Clicking on this button will initiate the client import process.
Select Xero as a platform
A popup window will appear, asking you to select the platform from which you want to import clients. Choose “Xero” from the available options.

Authenticate with Xero
After selecting “Xero,” you may be prompted to authenticate your Xero account. This ensures a secure connection between our system and your Xero Practice Manager (XPM) account.
Import Client List
Once authenticated, users can proceed to import clients from Xero. This import will include their basic details, making it easier for you to manage and access this information within TrustEasy.
Flow Diagram

Review Imported Data
After the import process is complete, take a moment to review the imported client data. You can make any necessary updates or changes within TrustEasy as needed and one such update is the tax file number update.
Most of the client’s data received from XPM, will be sitting under the “Not Imported” tab of “Import Logs” and the user will need to update the Tax file number to be able to import it in TrustEasy. The main reason for this is that TrustEasy uses Tax File Number as the main object to relate the client records with the ATO record and the data coming from Xero contains masked Tax File Number hence these details won’t update it in TrustEasy. TrustEasy masks the tax file number anyway for security purposes.
| User Status | Button Visibility | Import Xero clients? |
| Logged in with Xero | Yes | Yes, They can import Xero clients. |
| Not logged in with Xero and not connected with Xero from settings | No | No, They can not import Xero clients. |
| Not logged in with Xero but connected to Xero from settings | Yes | Yes, They can import users from Xero as they are connected to Xero from settings. |
| Logged in with Xero but disconnected from settings | No | No, The connection is required to import from Xero |